Understanding the Unity Publisher and Subscriber
Overview
This document explains the Dolby.io Real-time Streaming Publisher and Player plugins for Unity McPublisher and McSubscriber scripts. Specifically, we will look at:
- Adding the
McPublisherandMcSubscriberscripts and understanding the UI fields - Understanding how Credentials work
- Customizing publisher video settings
- Understanding the McSubscriber UI fields
- Rendering onto Materials
- Multisource publishing
- Audio Rendering in-depth
The McPublisher script
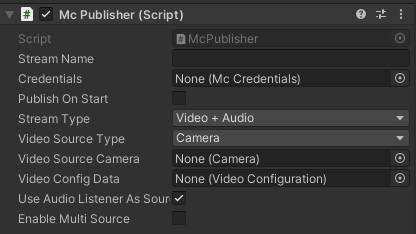
Assuming you have added the Dolby.io Real-time Streaming Publisher and Player plugins for Unity to the project, open a new scene, and add the McPublisher script to the Main Camera via the Add Component button in the Inspector on the right:
-
Stream Name: Once you create a publishing token in the streaming dashboard, you will obtain a stream name that you can use to publish with. If you have a wild-card token (
.*), you can use any stream name you would like, which is the preferred method since you can use the same credentials to publish multiple streams with different stream names from within your game. -
Credentials: A Scriptable Object of type
McCredentialsthat contains the necessary information to publish and subscribe. It will be discussed in detail in the Credentials section. -
Publish On Start: Tick this option to true to start publishing as soon as the game starts. In the next tutorial, we will learn how to use event handlers to control publishing.
-
Stream Type: There are three selections that allow to change the the type of sources to stream:
- Video + Audio: The ability to stream one audio source and one video source in your publisher. This is the default.
- Video Only: Only stream a video source.
- Audio Only: Only stream an audio source.
-
Video Source Type: This allow us to choose between using a
CameraorRenderTextureas a video source. For example, you can select the targetRenderTextureof a video player in Unity and attach it to the publisher to stream that into Millicast. -
Video Source Camera/Video Source Render Texture : A Camera/Render Texture to publish with.
-
Video Config Data: A Scriptable Object of type 'VideoConfiguration' that allows its users to customize the video aspects of the McPublisher, like the resolution, bitrate, codec, etc. We will elaborate more about Video Configuration in this tutorial.
-
Use Audio Listener As Source: If you add the
McPublisherto an object that contains anAudioListener, this option allows you to stream whatever audio in theAudioListenerto the Dolby.io Real-time Streaming service. A common use case is attaching this to the main character in the game, so the viewers can hear whatever the character is hearing. If you wish to use theAudioListeneras your source to publishing, you need have theMcPublisheradded to a GameObject that contains anAudioListener.- If you untick the option, you can select an
AudioSourceinstead for publishing.
- If you untick the option, you can select an
-
Enable Multi Source: This allows you to set a
Source IDto the publisher, so you can publish multiple to the same stream name from different publishers with different Source IDs at the same time.
Credentials
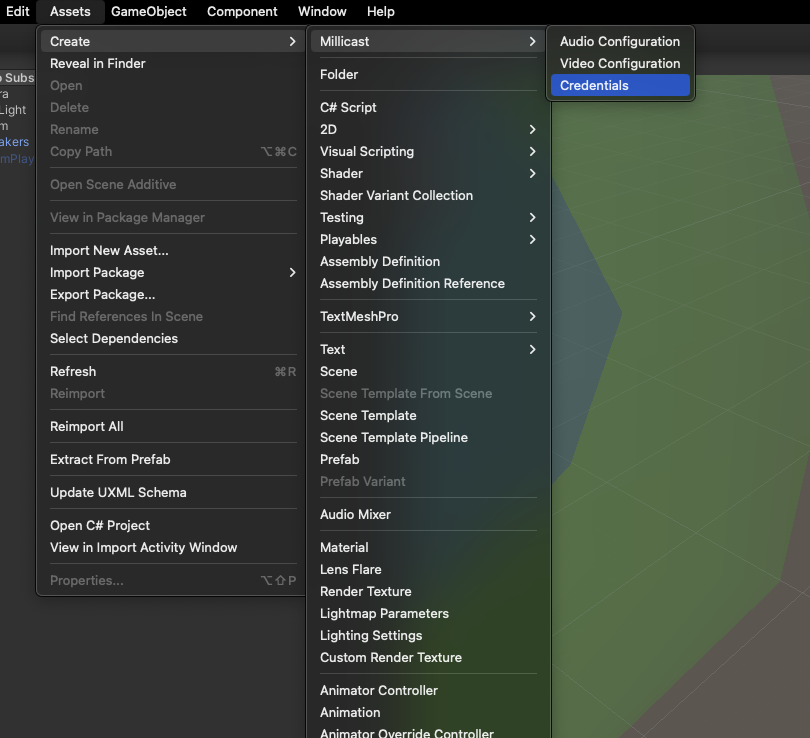
McCredentials is a Scriptable Object, that acts as a data store for your Dolby.io Credentials. You can reuse these credentials between multiple instances of the McPublisher and McSubscriber, and across different scenes. To create an instance of McCredentials, go to Assets > Create > Millicast > Credentials:
You can fill them with the credentials you obtain from the Millicast streaming dashboard.
Video configuration
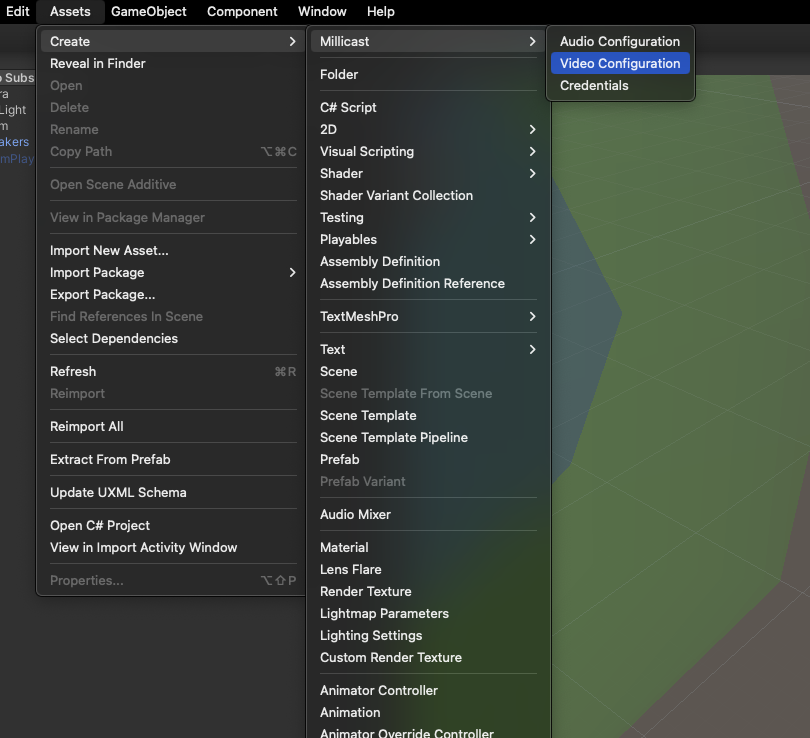
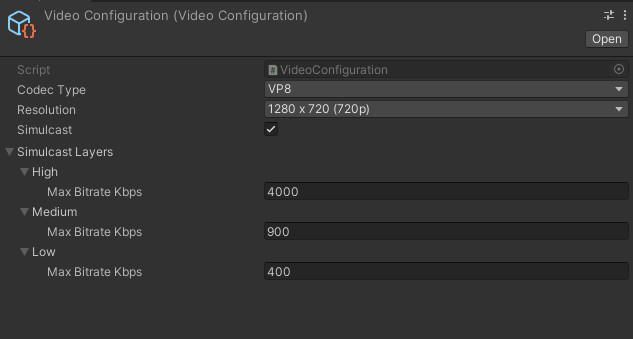
The McPublisher also allows you to adjust the streaming resolution, video codec to encode with, the bitrates and maximum FPS as well as enabling Simulcast. To create a Video Configuration Scriptable Object, go to Assets > Create > Millicast > Video Configuration:
-
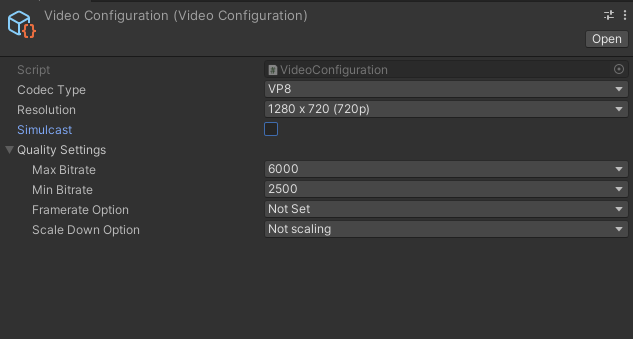
Codec Type: You can choose between VP8, VP9, H264 & AV1.
-
Resolution: The video resolution. You can stream in 720p, 1080p, 2K & 4K. Since H264 is hardware accelerated, certain platforms might not support all resolutions with it, therefore, if you choose a resolution that is not supported, it will automatically switch to a supported one.
-
Max Bitrate: The maximum encoding bitrate. Bitrate depends on the network bandwidth. The target bitrate might not always reach the maximum.
-
Min Bitrate: The minimum bitrate. Similarly, this depends on the network bandwidth, and the target bitrate might drop below the minimum if the network bandwidth is poor.
-
Framerate Option: This refers to the maximum framerate. Setting this value will cap the framerate of the video stream.
-
Scale Down Option: Scale down the chosen resolution. For example, selecting
2.0will halve the chosen resolution. -
Simulcast: Allows the publisher to send multiple streams with different bitrates. If you tick the
Simulcast Box, you will be able to select the bitrates for 3 layers; low, medium and high:
To set the publisher's video configuration, use the Video Config Data field.
If you'd like to learn more about changing the video configuration from within the scripting API, refer to the API documentation. You can also refer to the
Reference Sample Scenes > Scenes > VideoConfigExamplewhen you import theSamples.
The Millicast subscriber
The 3D karting game tutorial demonstrated how to add the McSubscriber to render a first person view of the game character onto a UI RawImage.
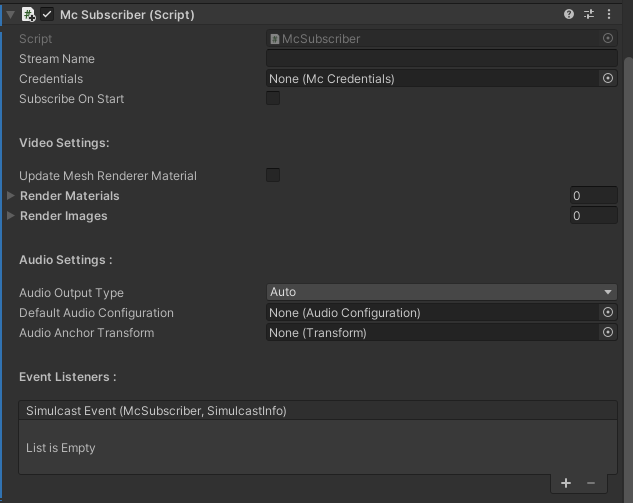
the McSubscriber component
-
Stream Name: The stream name to subscribe to. This field must match the same stream name you published to.
-
Credentials: The same credentials object as in the
McPublisher. -
Subscribe On Start: Enables you to subscribe as soon as the game (or scene) starts.
-
Update Mesh Renderer Material: If you add the subscriber to an object that contains a mesh renderer, i.e any 3D object, then checking this box allows the subscriber to render the incoming stream onto the object Material instance, rather than the Material's Asset. This is so that if you have the same Material used on multiple objects, the incoming stream won't override the textures for all the objects using that Material. In the next section, we will explain the different rendering approaches.
-
Render Materials: A list of
Materials to render the incoming video stream on. Once a material is added, any mesh renderer using that material will render the same stream. -
Render Images: A list of
RawImages to render the incoming video stream on. This is intended to render onto UI, like in the Karting game HUD example earlier. -
Audio Settings: A selection of Audio Settings to customize how the subscriber receives incoming audio streams. Specifically, it allows the users controls to render audio on standard audio sources, or to virtualize the experience, by rendering audio channels on separate audio sources via Virtual Audio Speakers. We will learn more about virtualizing audio streams in the next tutorials
- Audio Output Type: This selection allows the user to select between three different modes, as such:
- Auto: This gives control to the SDK to select the best option to render the incoming audio. If OS audio driver supports playback of the incoming audio stream's number of channels, then an
AudioSourcewill be instantiated. You can use theAudioConfigurationScriptable object selection to customize thatAudioSource's properties. If however, the audio driver does not support the incoming audio channels, i.e. having a stereo speaker setup while receiving 5.1 content, then the subscriber will spawn a virtual 5.1 speaker setup, where each channel will be played on its respective audio source, thus virtualizing the experience. - Virtual Speakers: This options gives the user the freedom to create their own
VirtualAudioSpeakerprefab, which can be stereo or 5.1, and provide it to the subscriber to rendering incoming audio streams on. The user must make sure to select aVirtualAudioSpeakerthat can play the incoming audio channel count, for example selecting 5.1 speaker to playback either stereo content or 5.1 content. - Audio Source: This selection will attempt to use the Audio Source the user provides for audio playback. Make sure that the OS audio driver and Unity's Audio Settings can playback the incoming audio stream's channel count. Otherwise, an exception will be thrown.
- Auto: This gives control to the SDK to select the best option to render the incoming audio. If OS audio driver supports playback of the incoming audio stream's number of channels, then an
- Default Audio Configuration: This is used to customize the AudioSource/VirtualAudioSpeaker instantiated using the Auto option.
- Audio Anchor Transform: This is to make the instantiated AudioSource/VirtualAudioSpeaker follow the provided transform component of an object.
- More about Audio Rendering in the next tutorials.
- Audio Output Type: This selection allows the user to select between three different modes, as such:
-
Event Listeners/Simulcast Event: This event listener allows you to attach a Simulcast Callback that accepts an
McSubscriberand aSimulcastInfothat is called whenever that subscriber receives new simulcast info. This is used to select between different simulcast layers when they are dynamically received from the Millicast Service. For more information, head to the API Documentation
Rendering onto materials
Start with a basic 3D scene. Add a Sphere:

Create a new Material from the Assets > Create > Materials tab. Let us call it DemoRenderMaterial:

Change the Sphere Mesh Renderer material to DemoRenderMaterial:

Add an McSubscriber component to the Sphere, and add DemoRenderMaterial to the list of Render Materials:
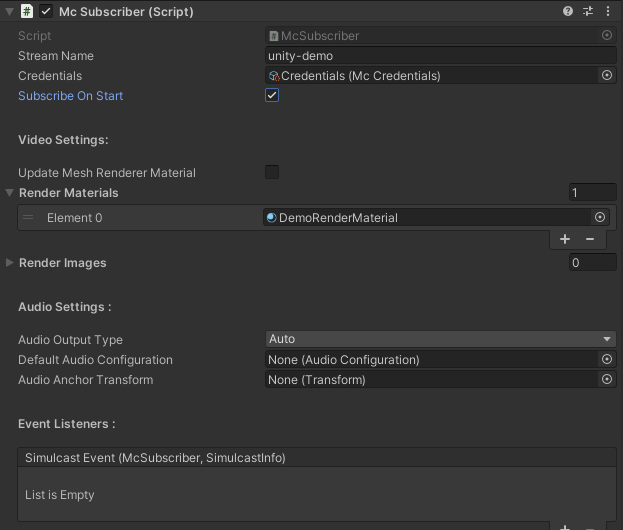
Do not forget to add your Credentials, your stream name, and enable Subscribe On Start. Note: here we are publishing directly from the web dashboard.
Note: If you are unsure how to publish from the web viewer, see: How to broadcast in dashboard
Now that we have all the pieces of the puzzle, start the scene and observe the sphere:

We can adjust the material's properties as well. For example, we can make it more metallic and smoother:


Note: The difference between using
Render Materialslist, and usingUpdate Mesh Renderer Material, is that the latter will update theMesh RendererMaterial instance directly, applying the effect onto the containing objects instance. This means, other objects using the same material will not be affected. This is useful if you just want the object you added theMcSubscriberto render the incoming video. In the prior case, adding a material toRender Materialswill update all objects whoseMesh Rendererutilizes that Material. This is useful if you have multiple objects, on which you want to render the same stream, and is more efficient.Note: if you are using URP (Universal Render Pipeline), using the Standard Lit shader on the material will cause issues. Make sure to choose a Shader that works with your scene, otherwise the stream won't render. For example, using the Unlit texture will work on both URP and non-URP projects.
Updated 4 months ago