Allowed Origins
Manage Access with Domain Name or Network IP Addresses Verification
Impose limits on who may use a token to broadcast or view a stream by defining rules based on the domain name or IP address in which the request originated. Allowed Origins enables defining specific domain names or sub-domain patterns that any request must originate from. Similarly, with IP Address Filters you can define rules that limit access by specifying the network IP address.
These approaches are sometimes referred to as whitelisting, a security mechanism to prevent unauthorized access. Even when token credentials are provided, if the domain or IP address does not originate from an expected network location, permission is denied. These types of access restrictions allow only specific known hosts or applications to broadcast with a publish token or playback using a subscribe token.
Allowed origins
Setting up allowed origins as a means of access control is done by specifying the domain where a request will originate. If you have deployed a website or application to a cloud provider you may not know the IP address of a server but any usage of a token can be restricted to the domain name for your application.
- A single domain:
millicast.com - Multiple domains comma delimited:
millicast.com, streaming.dolby.io - Wildcard domains:
*.dolby.io
This approach helps prevent unauthorized usage of tokens.
How-to set allowed domains using the dashboard
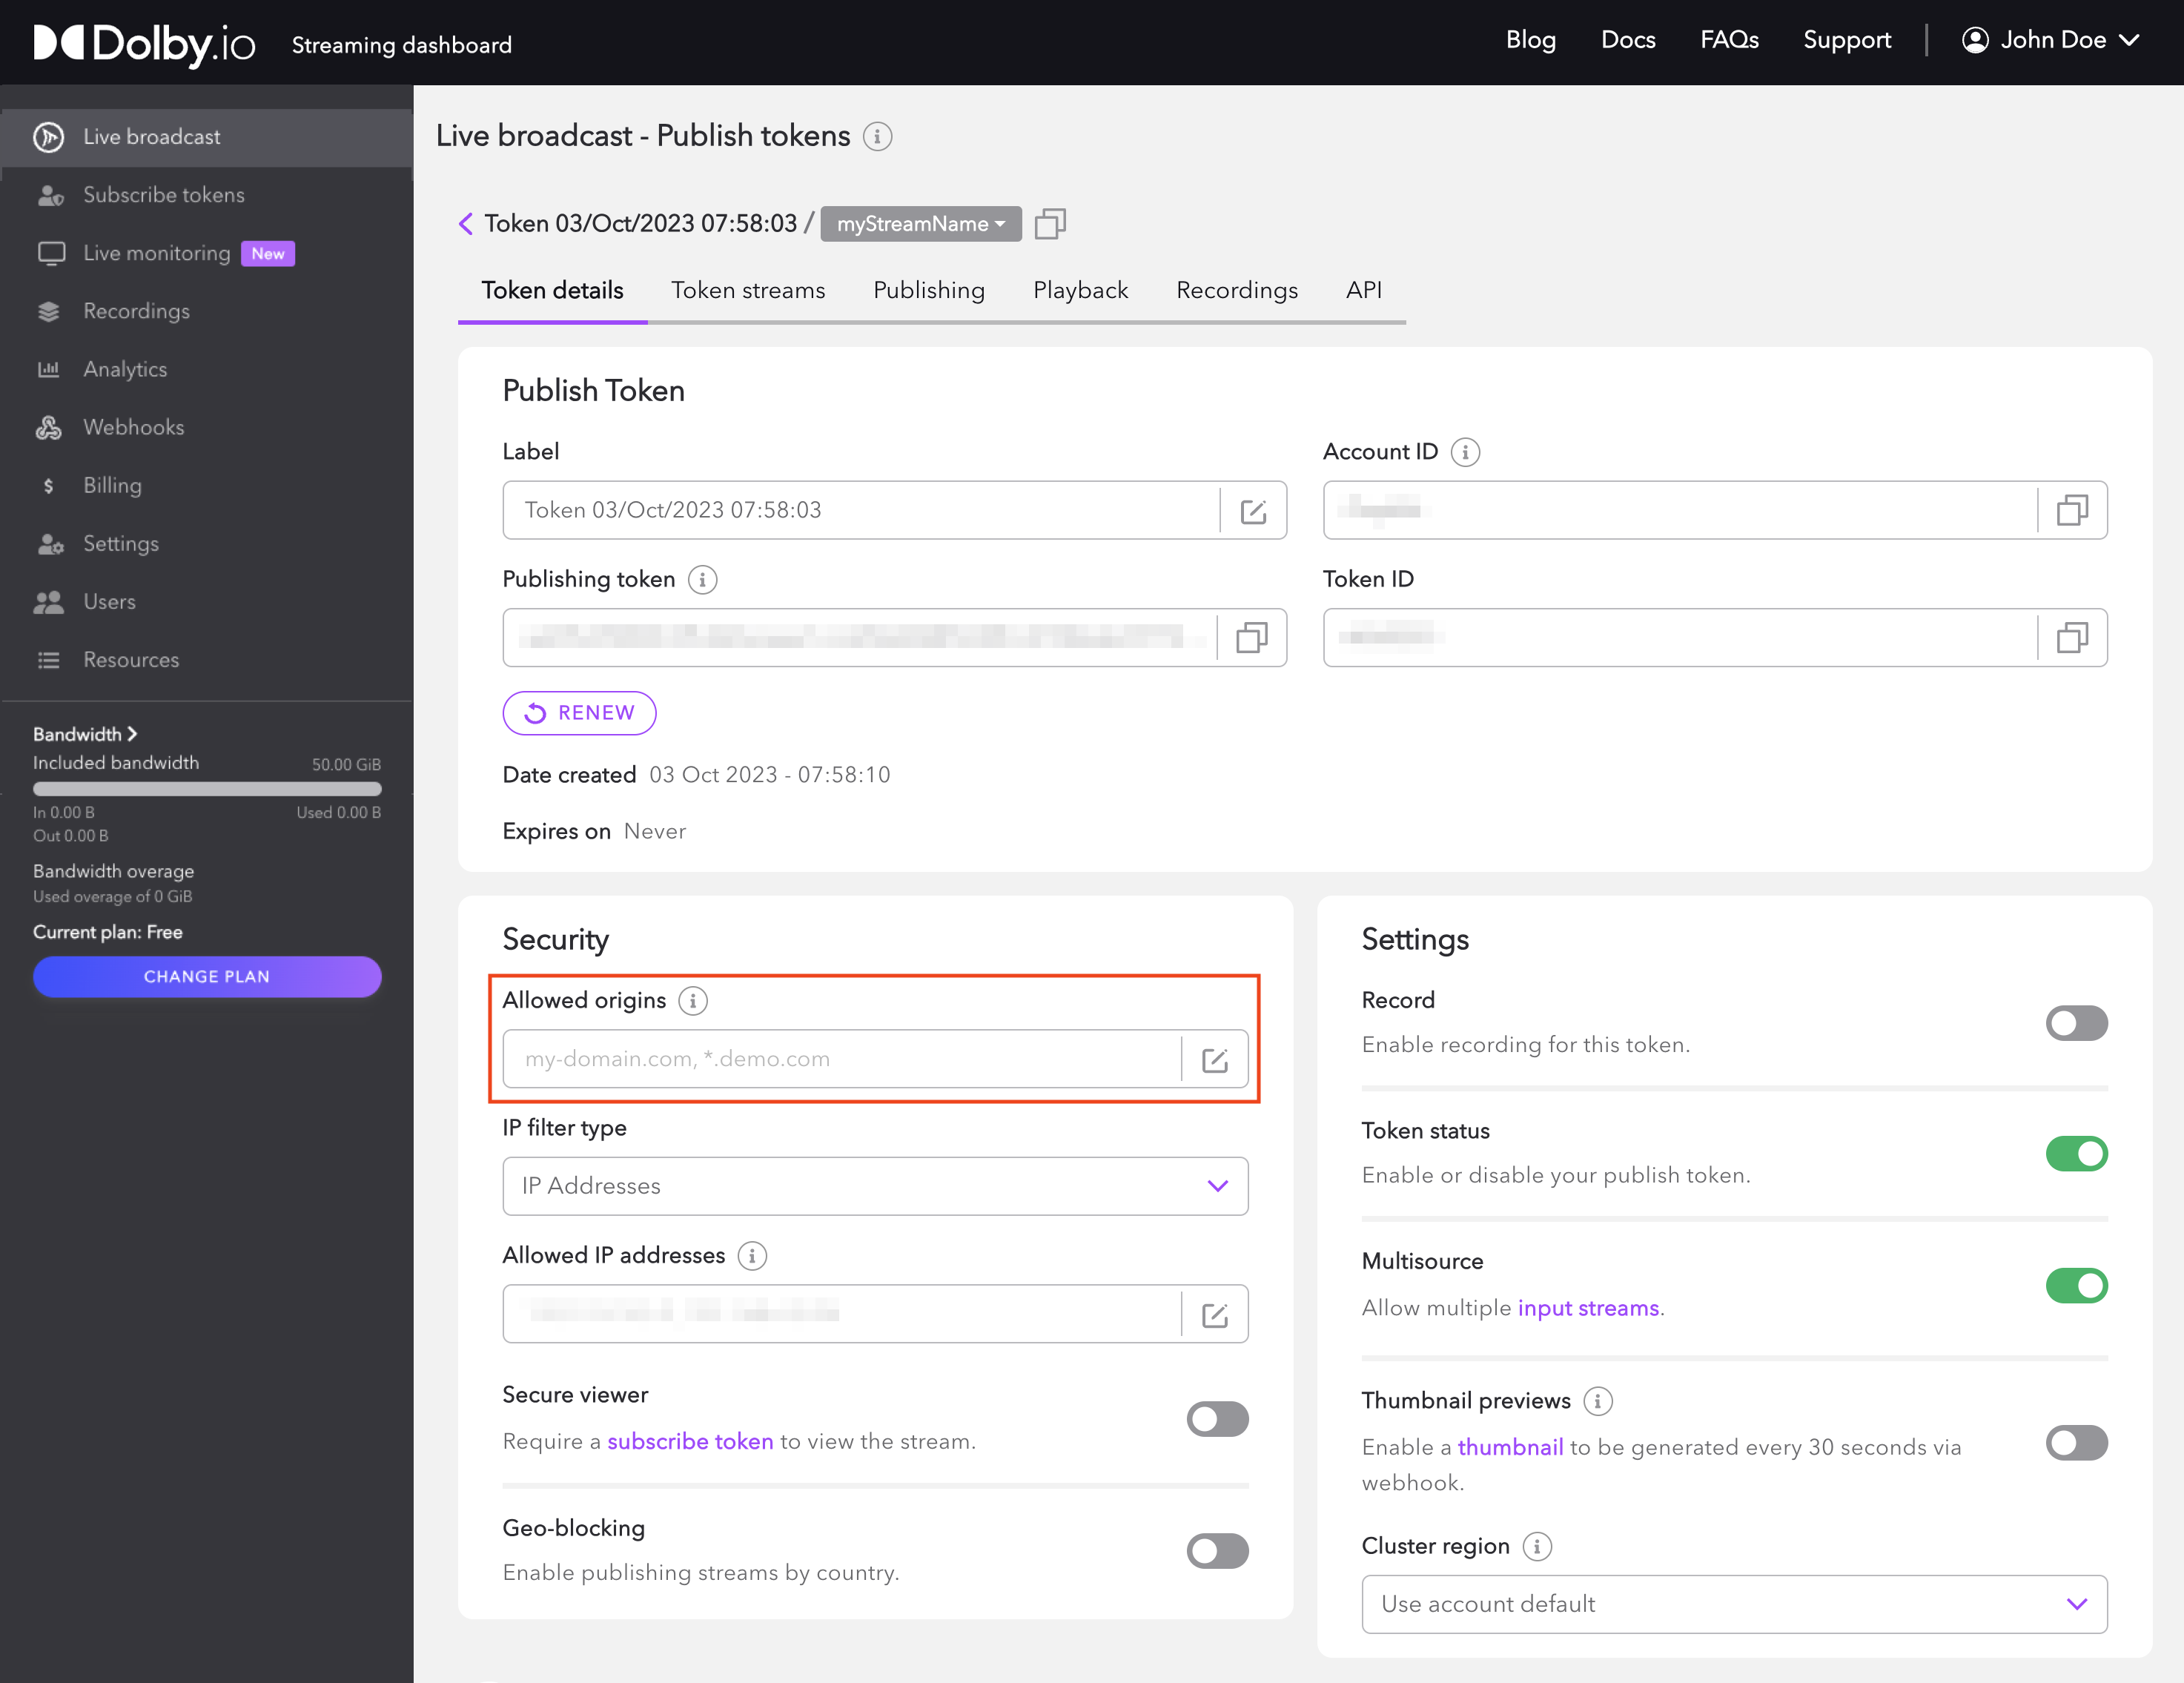
You can manage allowed origins by changing settings from the user interface of the Streaming Dashboard.
Getting Started
If you haven't already, begin by following the Getting Started tutorial to create a Dolby.io application and start your first broadcast. You will need to have a publishing token. See Managing Your Tokens for more details about tokens.
Open the Live Broadcast section of the Dolby.io Dashboard. Select the publishing token you want to secure. Within the Security section you can edit the Allowed origins to specify a list of domain names.

Restricting Viewers
By default, a publish token does not restrict viewers of the broadcast. If you want to also restrict viewers by origination, you must also setup access control with the secure viewer to require a subscribe token authorization to view the stream. There is a similar form value in the Subscribe tokens section of the dashboard.
IP filters
Setting up an IP filter as a means of access control may depend on whether or not you know the originating IP address ahead of time.
- If you have known static IP addresses that do not change, you can identify specific allowed IP addresses.
- If the IP address is unknown or dynamic and might change between sessions, you can bind IP after usage so that the IP address of any initial requests are accepted and the IP address is bound to the token. Any additional usage from that IP address will continue to be accepted but subsequent IP addresses would be rejected.
IP Filters with RTMP
This access control method is not supported when using RTMP.
Allowed IP addresses
This approach allows for explicitly defining multiple IPv4 addresses or _Classless Inter-Domain Routing (CIDR) _notated network blocks when creating or updating a token. A token will only be accepted when the requesting IP address originates from one of the network addresses that match.
For example, to allow only a specific person or persons to broadcast you would specify the publisher's IP address in this property. If you wanted only a specific organization to be able to watch, you might specify the series of IP addresses in a subscribe token so that content can only be viewed within a specific network.
- a single IP address:
170.123.145.2 - multiple IP addresses comma delimited:
170.123.145.2, 170.123.145.3 - CIDR supernets:
192.168.6.0/24
Using IP address ranges and wildcards are not supported.
Once IP addresses are set, only requests from that address or network will be permitted to broadcast or view a stream. If the user's network changes, they will be rejected for future connections. The Allowed IP addresses can be updated.
Bind IP on usage
The bind IP on usage approach allows for explicitly defining how many IP addresses to accept rather than specific ones. As they are gathered and bound to the token, any subsequent requests beyond the count will then be rejected.
You might think of this as appending any IP address requests to the Allowed IP Address list only after they are dynamically determined.
For example, if you want to be able to share a stream with a specific end-user without allowing that person to re-share the same viewer link with others. The platform will bind to the first IP address encountered and then restrict any additional access using the same token.
How-to set IP filters using the dashboard
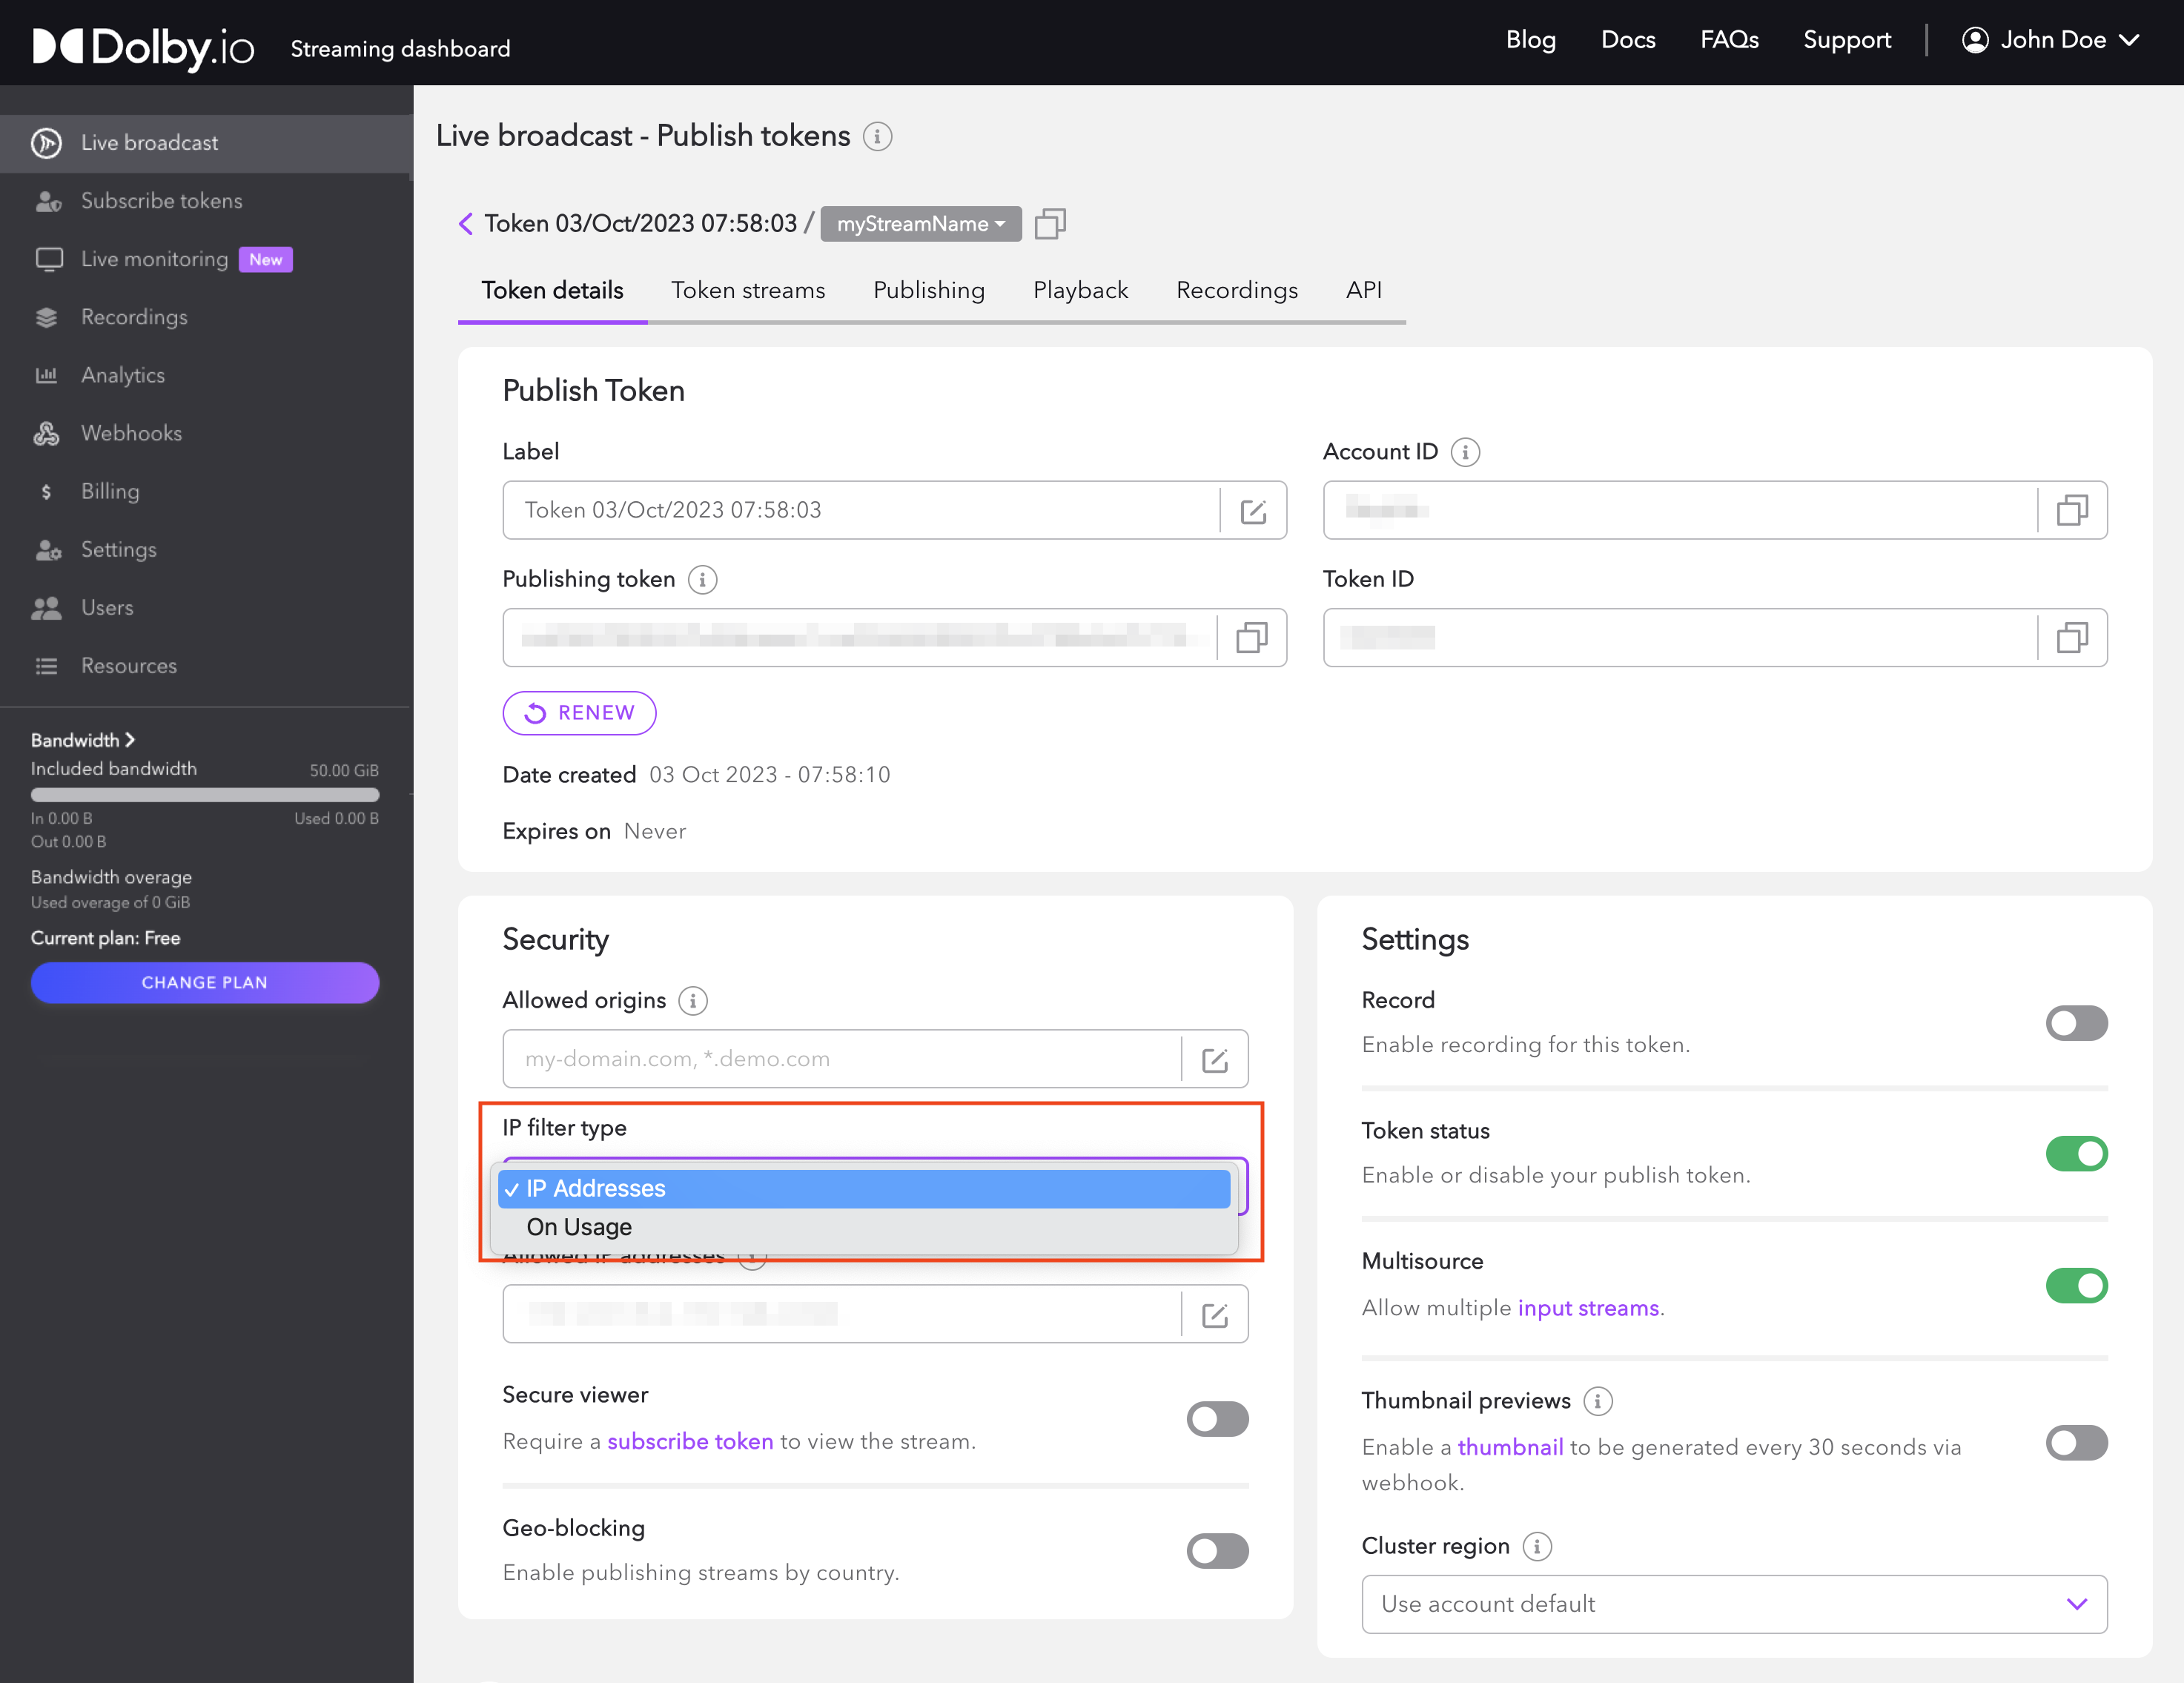
You can manage IP filters by changing settings from the user interface of the Streaming Dashboard.
Getting Started
If you haven't already, begin by following the Getting Started tutorial to create a Dolby.io application and start your first broadcast. You will need to have a publishing token. See Managing Your Tokens for more details about tokens.
Open the Live Broadcast section of the Dolby.io Dashboard. Select the publishing token you want to secure. Within the Security section you can change the IP filter type from the dropdown.

You then can input the IP addresses or number of addresses to bind, into the form.
Restricting Viewers
By default, a publish token does not restrict viewers of the broadcast. If you want to also restrict viewers by IP address, you must also setup access control with the secure viewer to require a subscribe token authorization to view the stream. There is a similar form value in the Subscribe tokens section of the dashboard.
REST APIs
When working with allowed origins and IP filters you can automate workflows using available REST APIs.
- The /api/publish_token endpoint allows you to update the allowed origins or IP addresses for an existing publish token or to define a value when creating a new token
- The /api/subscribe_token endpoint allows you to update the allowed origins or IP addresses for an existing subscribe token or to define it while creating a new token
Using the REST APIs
Review the REST API platform guide for more details on generating an API secret for authentication. You will need an API Secret from the dashboard in order to make requests.
How-to add allowed origins with the REST API
For both the /api/publish_token and the /api/subscribe_token you can define the allowedOrigins parameter when you use a POST request to create a new token. For existing tokens, you'll use the PUT method to change the value using updateAllowedOrigins.
Here is an example of updating the Allowed Origins:
curl -H "Authorization: Bearer [your_api_secret]" \
    -H "Content-Type: application/json" \
    https://api.millicast.com/api/subscribe_token/[token id] \
    -X PUT -d '{"updateAllowedOrigins": ["millicast.com","*.millicast.com"]}'
Review the /api/publish_token and /api/subscribe_token reference for additional examples.
How-to add IP filters with the REST API
For both the /api/publish_token and the /api/subscribe_token you can define the allowedIpAddresses or bindIpsOnUsage parameters when you use a POST request to create a new token. For existing tokens, you'll use the PUT method to change the value using updateAllowedIpAddresses or updateBindIpsOnUsage values respectively.
Here is an example of updating the Allowed IP Addresses:
curl -H "Authorization: Bearer [your_api_secret]" \
    -H "Content-Type: application/json" \
    https://api.millicast.com/api/subscribe_token/[token id] \
    -X PUT -d '{"updateAllowedIpAddresses": ["255.255.255.255"]}'
and to update the Bind IP on Usage:
curl -H "Authorization: Bearer [your_api_secret]" \
    -H "Content-Type: application/json" \
    https://api.millicast.com/api/subscribe_token \
    -d '{"bindIpsOnUsage": 1}'
Review the /api/publish_token and /api/subscribe_token reference for additional examples.
How-to remove IP filters
If you want to reset either a publish or subscribe token to no longer restrict access, you can use a bind value of zero and an empty array to clear out the settings and revert to the default.
curl -H "Authorization: Bearer [your_api_secret]" \
    -H "Content-Type: application/json" \
    https://api.millicast.com/api/subscribe_token/100 \
    -X PUT -d '{"bindIpsOnUsage": 0, "updateAllowedIpAddresses": []}'
Consult the /api/publish_token and /api/subscribe_token reference for additional examples.
Troubleshooting
Error initializing the Publisher.Error: Unauthorized: IP Address not allowed
If the IP address detected does not match the IP Filters enabled, the user might be presented an error like this in the broadcast application.

Verify that the IP address you are broadcasting from is static and correctly input for the publishing token being used.
Error initializing the Publisher.Error: Unauthorized: Origin not allowed
If the domain detected does not match the allowed origins, the user might be presented with an error like this in the broadcast application.

Verify that the domain your application is running from is included.
Allow the Streaming Dashboard
Include streaming.dolby.io in your list of domains if you want to be able to continue broadcasting using the Dolby.io Streaming Dashboard.
Updated about 1 year ago