Unreal Player Plugin
Dolby.io Real-time Streaming Player Plugin for Unreal Engine
- Supported Unreal Engine version 5.1
- Supported Unreal Engine version 5.0.3
- Supported Unreal Engine version 4.27
- Supported on Windows and Linux
- Version 1.5.3
This plugin enables you to play a real time stream from Dolby.io Real-time Streaming in your Unreal Engine game.
You can configure your credentials and configure your game logic using Unreal objects and then render the video in a texture2D.
Installation
You can install the plugin from the source code, using the following steps:
- Create a project with the Unreal Engine (UE) editor
- Close the editor
- Go at the root of your project folder (C:\Users\User\Unreal Engine\MyProject)
- Create a new directory "Plugins" and change to this directory
- Clone the MillicastPlayer repository:
git clone https://github.com/millicast/millicast-player-unreal-engine-plugin.git MillicastPlayer - Open your project with UE
You will be prompted to re-build MillicastPlayer plugin. Click "Yes".
You are now in the editor and can build your game using MillicastPlayer.
Note: After you package your game, it is possible that you will get an error when launching the game:
"Plugin MillicastPlayer could not be load because module MillicastPlayer has not been found"
Then, the game fails to launch. This is because Unreal has excluded the plugin. If this is the case, create an empty C++ class in your project. This will force Unreal to include the plugin. Then, re-package the game, launch it, and the issue should be fixed.
Enable the plugin
To enable the plugin, open the plugin manager in Edit > Plugins.
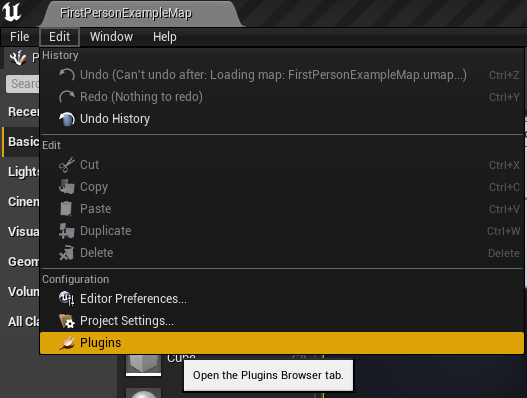
Then search for MillicastPlayer. It is in the category "Media Players". Tick the "enabled" checkbox to enable the plugin. It will prompt you if you are sure to use this plugin, because it is in beta. Click "Accept". After that Unreal will reboot in order to load the plugins.
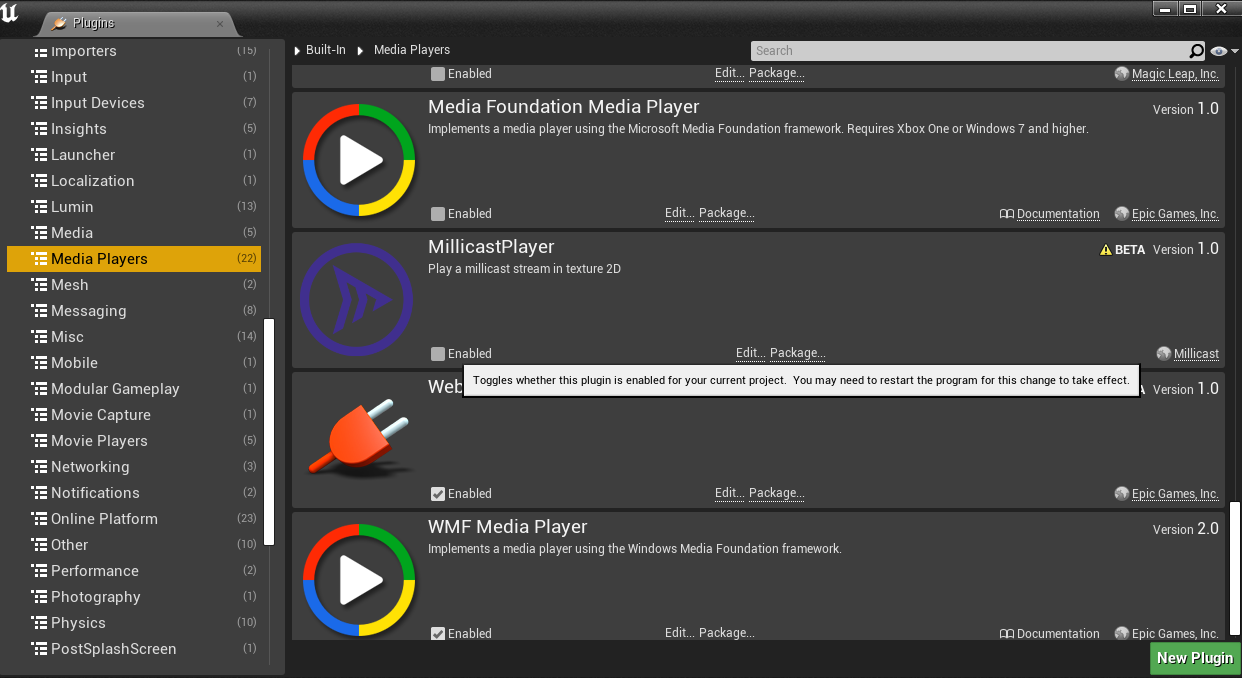
If it is already enabled, just leave it as is.
Setup your stream in the editor
Basically, you have several Unreal objects to configure in order to view a stream in your game.
First, we will see how to configure a media source to setup your Dolby.io Real-time Streaming credentials. Then how to render the video in a texture 2D, by attaching it to an object in the World. Finally, implement the logic of the game using a blueprint class.
MillicastMediaSource
The media source object allows you to configure your credentials and is the source of the WebRTC video stream. To add a MillicastMediaSource object, add a new asset by clicking "Add/Import", and you will see the object in the "media" category.
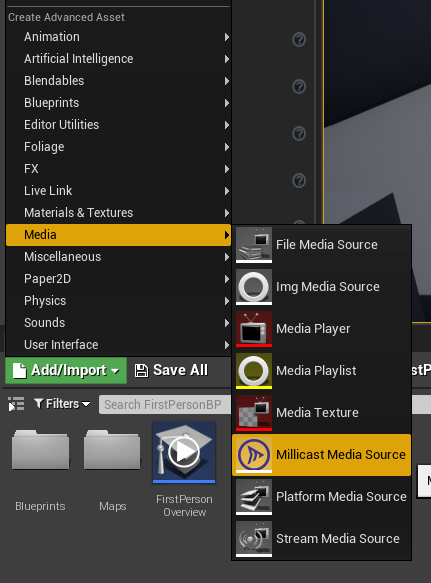
Then, you can double-click on the newly created asset to configure it.
The menu is divided into two categories. First, the Dolby.io Real-time Streaming credentials:
- The stream name you want to subscribe to
- Your account id
- Whether you need to use the subscribe token or not. If you are using a secure viewer, enable it and enter your subscribe token. Otherwise, leave it set to the default.
- The subscribe api url, which usually is https://director.millicast.com/api/director/subscribe

MillicastTexture2D player
This object is a receiver/consumer for WebRTC video frames and will render the frames in a texture 2D.
You can create though the asset panel.
You can also create a MillicastTexture2D from it.

MillicastTexture2D
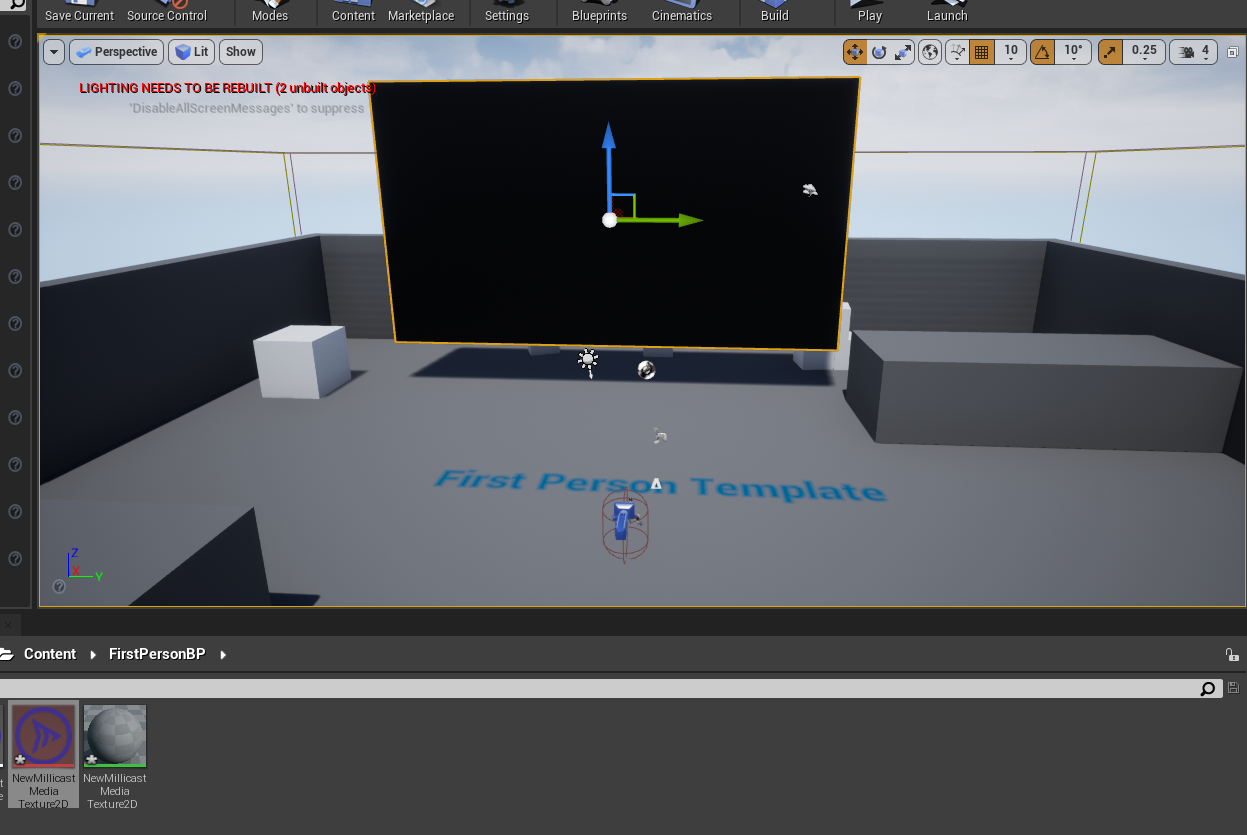
The MillicastTexture2D is a texture you can apply to an object in your world. Once it is created, you can drag and drop it in the editor, on the object that will be used to render the video. In the image below, the texture will be applied to the plane. You can see the plane is now black because no frames are currently redendered. When you apply the texture, you will see that a material object is created in your assets.
Millicast audio actor
This object is used to render an audio track in your scene. It holds an AudioComponent instance and you can configure it to enable spatial sound. If you want spatial sound to work, navigate to the Attenuation menu, enable the spatialization and override the attenuation settings.
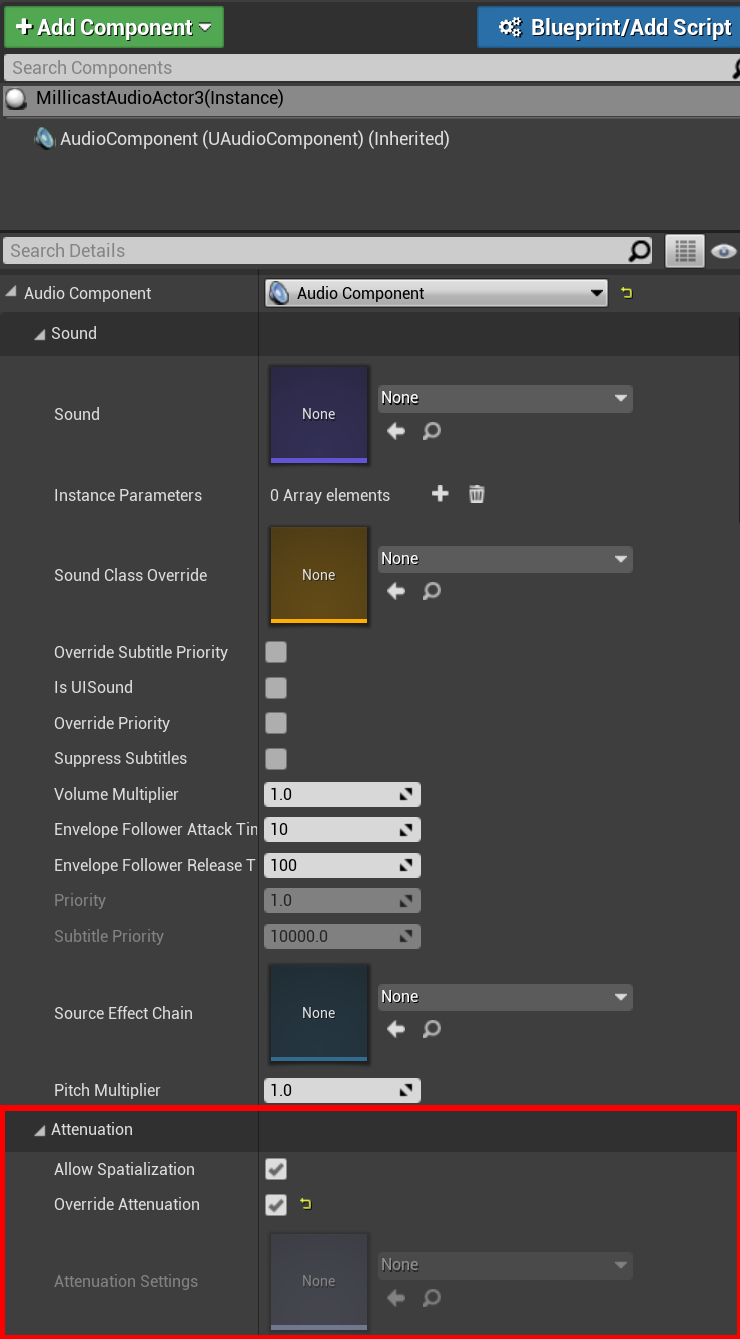
Like any other actor, you can search for it in the editor among the actors object and drag and drop it into your scene.
Blueprint
We will now see how to implement the logic using the blueprint.
To do something really simple, the game will subscribe to Dolby.io Real-time Streaming when it starts playing and unsubscribe when it ends.
To do that, the two important components are:
- MillicastDirectorComponent: this object is used to authenticate to Dolby.io Real-time Streaming using the credentials you provided in the Dolby.io Real-time Streaming media source and get the WebSocket URL and JWT.
- MillicastSubscriberComponent: this object subscribes to the WebRTC stream by using the WebSocket URL and the JWT.
To do all this, first create a blueprint class. In the dialogue window, select actor.
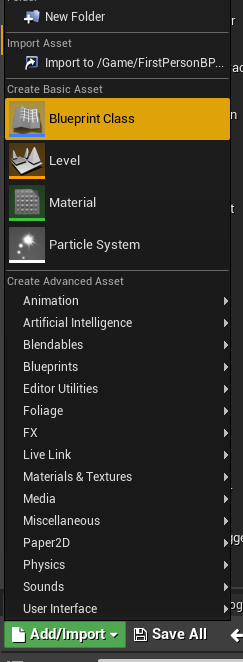

Add it in your world (by dragging and dropping,it is not visible when the game is playing) and double click on it.
Go to the event graph.
Add the Director and subscriber component.
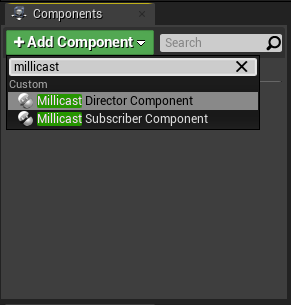
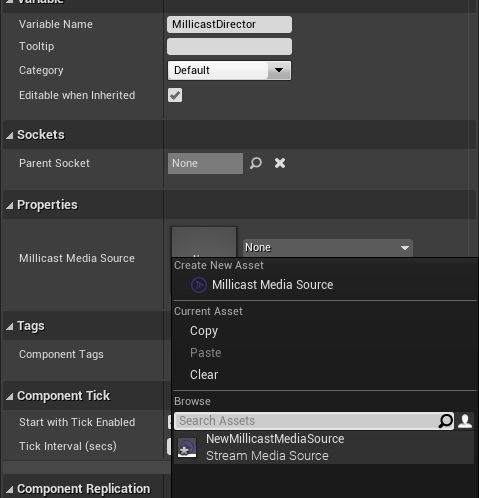
Both components need the instance of the MillicastMediaSource object. Assign it by clicking one component and go into the right hand panel. Be careful and assign the one you already created. Do not create a new one.
Director component
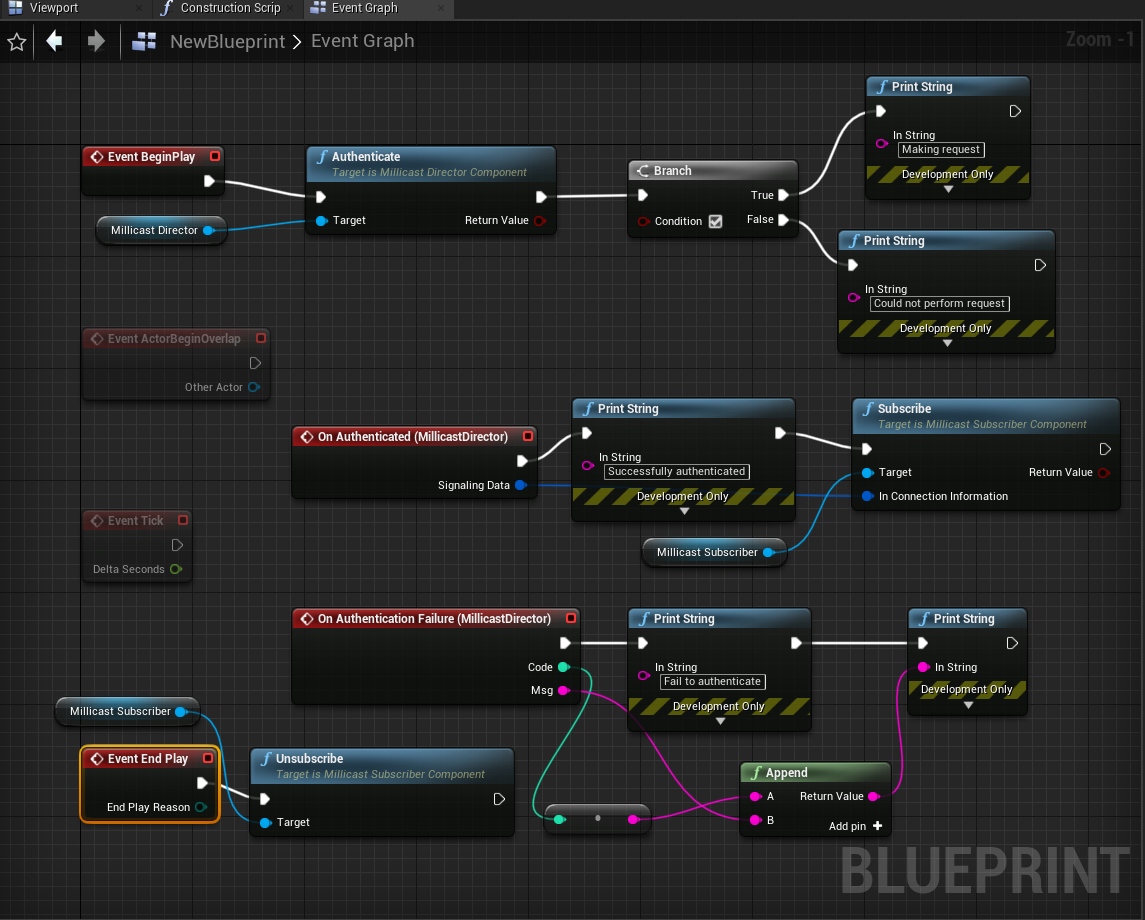
The important method here is Authenticate. Drag and drop your object into the graph and make a connection with this method. It returns a boolean to say if the request has been made or not.
If the request is successful, it will fire an event, OnAuthenticated. That event forwards a parameter, the Signaling information, which are the WebSocket URL and the JWT.
If the request is not successful, it fires the event, OnAuthenticationFailure with the HTTP error code and the status message.
Connect the event begin play to the Authenticate method so the game will make a request to Dolby.io Real-time Streaming when starting.
Subscriber component
Connect the event OnAuthenticated with the signaling info to the method Subscribe. This method will subscribe to the Dolby.io Real-time Streaming stream and receive WebRTC audio and video tracks.
Then add a new event, Event End Play, which is an event fired when the game ends, and connect it to the method Unsubscribe to unsubscribe from the stream.
When you are subscribed, if you receive video or audio tracks, the event On Video Track and On Audio Track will be fired. It will give you the corresponding track. This object has a AddConsumer method, which lets you add audio and video consumers. To set up the video consumer, create a variable and set its type to Millicast Texture2D Player , after compiling you can set its value to Millicast Texture2D Player. To setup the audio consumer, create a variable and set its type to Millicast Audio Actor. Then, drag the variable to the scene and set it after compiling the blueprint.
When a track has a consumer, it calls a callback to feed audio/video data. The consumer itself then renders the data in the scene.
Example
Here is an example of how to connect everything.


Launch the game
Start broadcasting media to Dolby.io Real-time Streaming from Millicast Studio, OBS, or your browser. Note that for now, only VP8 and VP9 are supported by the plugin. You can quickly test if everything works by playing the game in the editor. You can subscribe to Dolby.io Real-time Streaming and render the video track in the texture. However, the audio will not play in the editor. You need to launch the game on your platform, or package it to hear audio.
Note that H.264 is the default codec for screen sharing. To change the codec, click the gear icon, select media settings, and select the preferred codec from the drop-down list.
Setup the stream name dynamically
In the above example, the credentials were configured in the Media Source, but we could not change them directly from the game. The game was launching and subscribing to Dolby.io Real-time Streaming with the stream name we configured from the editor. Let's see now how to modify the stream name on a given event that happens in the game.
To illustrate this, we will walk through an example project, where when we shoot a cube, the game starts subscribing to a specific stream, and if we shoot another cube, the game subscribes to another stream. Each cube is associated with a stream.
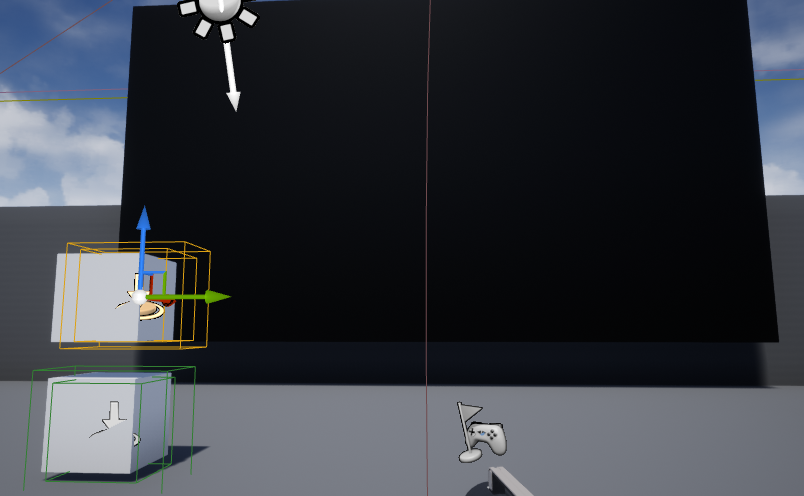
Basically, we must be able to detect a collision event on the cube, which will set the stream name on the Millicast Source and then call an event in our main blueprint to start subscribing. To modify the Millicast Source object's stream name, we must get a reference on the object, either in the blueprints or in a C++ class. We will demonstrate both methods.
First let's see the main blueprint. Create a blueprint and add it in your game environment. Open the event graph.
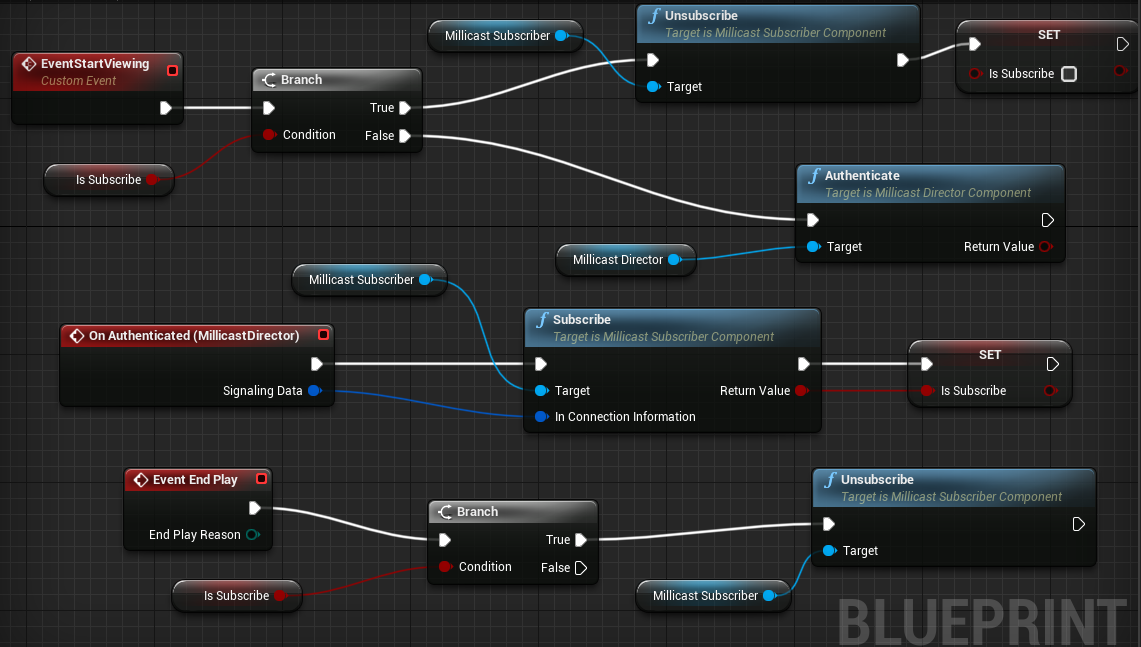
The logic here is to create a custom event EventStartViewing. This event will be called by the blueprint associated with the cube, when a collision occurs. When it is fired, we check if we are already subscribed. If so, we stop subscribing and stop the viewer. Otherwise, we start it.
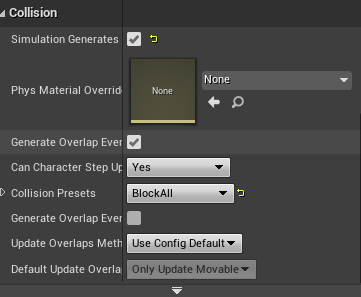
Let's see how to trigger a collision. Create a blueprint, or add a box trigger around the cube and replace the blueprint with a custom one. Check "Simulation Generates hit" to generate hit triggers, and "Block All" collision presets.
Now we can open the associated blueprint. Add an "Event Hit". Now let's see how to configure the Media Source object.
Using only blueprint
When using only the blueprint, add a public variable of type MillicastMediaSource. Then, you can just set the stream name like the event graph below.

Close the event graph editor, in the settings of the box trigger, add the instance of the MillicastMediaSource object you already own, and the main blueprint instance. All public members are visible in the settings.
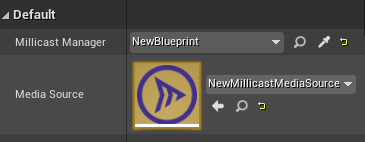
Using a C++ class
Create a C++ class (actor component in this example).
When Visual Studio opens, first add MillicastPlayer as a dependency in your Project.build.cs file.
PrivateDependencyModuleNames.AddRange(new string[] { "MillicastPlayer" });
Now, you can include and link against Millicast player public object. The header file below has an instance of a UMillicastMediaSource object. It is set when Initialize is called. ConfigureSource is the method we will call from the blueprint event graph to configure the stream name.
// USourceConfiguratorComponent Header

#pragma once

#include "CoreMinimal.h"
#include "Components/ActorComponent.h"
#include "MillicastMediaSource.h"


#include "SourceConfiguratorComponent.generated.h"

UCLASS( ClassGroup=(Custom), meta=(BlueprintSpawnableComponent) )
class MYPROJECT2_API USourceConfiguratorComponent : public UActorComponent
{
	GENERATED_BODY()

private:
	UPROPERTY(EditDefaultsOnly, Category = "Properties", META = (DisplayName = "Millicast Media Source", AllowPrivateAccess = true))
		UMillicastMediaSource* MillicastMediaSource = nullptr;

public:
	// Sets default values for this component's properties
	USourceConfiguratorComponent();

	bool Initialize(UMillicastMediaSource* Source = nullptr);

	UFUNCTION(BlueprintCallable, Category = "Component", META = (DisplayName = "ConfigureSource"))
	void ConfigureSource(FString StreamName, FString AccountId);

	UFUNCTION(BlueprintCallable, Category = "Component", META = (DisplayName = "ConfigureSourceWithUrl"))
	void ConfigureSourceWithUrl(FString StreamName, FString AccountId, FString ApiUrl);

	UFUNCTION(BlueprintCallable, Category = "Component", META = (DisplayName = "ConfigureSecureSourceWithUrl"))
	void ConfigureSecureSourceWithUrl(FString StreamName, FString AccountId, FString ApiUrl, FString SubscribeToken);

protected:
	// Called when the game starts
	virtual void BeginPlay() override;

public:
	// Called every frame
	virtual void TickComponent(float DeltaTime, ELevelTick TickType, FActorComponentTickFunction* ThisTickFunction) override;


};
// USourceConfiguratorComponent source

bool USourceConfiguratorComponent::Initialize(UMillicastMediaSource* InMediaSource)
{
	if (MillicastMediaSource == nullptr && InMediaSource != nullptr)
	{
		MillicastMediaSource = InMediaSource;
	}

	return InMediaSource != nullptr && InMediaSource == MillicastMediaSource;
}

void USourceConfiguratorComponent::ConfigureSource(FString StreamName, FString AccountId)
{
	MillicastMediaSource->StreamName = std::move(StreamName);
	MillicastMediaSource->AccountId = std::move(AccountId);
}
Now, build your solution. Return to the Unreal Engine editor. Open the blueprint associated in the box trigger. Add the Source configurator component.
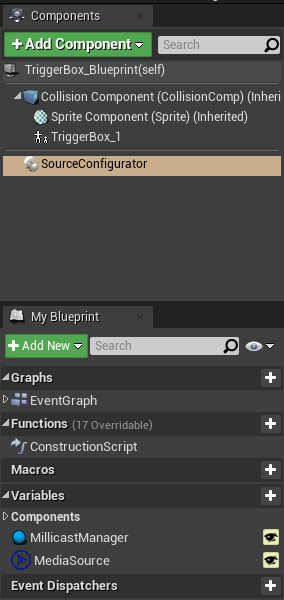
Don't forget to set up the MillicastMediaSource instance in the right panel. This is the step that will call our Initialize function.

Now, you can make the event graph:

Now, just launch the game, and shoot one of the cubes to start one stream or another. This is a simple example, where we have hardcoded stream names in the blueprint event graph. You can do something more complex, like a REST API call in your C++ class when the collision occurs and then configure the MediaSource object.
Subscriber's event
In the Subscriber's component, you can connect several events received from the Dolby.io Real-time Streaming media server.
On Active event
This event is called when a new track is being published in the stream. You will get the stream id, the source id and an array of track information corresponding to the tracks being pushed by the publisher.
On Inactive event
This event is called when a source has been unpublished within the stream.
On Stopped
This event is called when the stream is no longer available.
On Vad
This event is called when an audio track is being multiplexed.
You will get the mid of the track and the source id of the publisher.
On Layers
This event is called when simulcast/SVC layers are available. You will get the mid of the track and an array of the layers.
On Viewer count
This event is called when a viewer starts or stops viewing. You get the new viewer count each time it is called.
Receive multisource stream
Now that we have seen all the subscribers events, you are now able to receive multisource streams. Typically, you will get the tracks and source IDs of the publishers in the active event. When you get that information, you must use the project method from the subscriber to forward the media from a track of a given source into a given track. To get track input for project source, you can use the video track from the On Video Track function and promote it to the variable. Since you do not know how much track you will receive in the active event, and as default there is only one audio/video track negotiated in the peerconnect, you can use the subscriber's method addRemoteTrack to dynamically add a new track to the peerconnection by renegotiating the SDP.
As an example blueprint:


WebRTC statistics
Stat command
You can monitor the WebRTC statistics of your current connection. In the Unreal console, enter this command: stat millicast_player. This will display the statistics of the plugin on the top left of the viewport.
CSV profiler
It is possible to save the RTC statistics using the Unreal CSV profiler.
First you need to enable the category in console: csvCategory millicast_player
Then, start the profiler: csvProfile start.
And to stop it: csvProfile stop
You must have enable the statistics through the stats command first if you want the statistics to be saved in the CSV file.
The output file will be in your project, in: Saved/Profiling/CSV.
Issues that can occur
WebRTC linking issue
If you encounter a linking issue when building your project related to the destructor of IceServer, you may need to add the WebRTC module to the dependencies of your project (in your Build.cs file).
Updated 4 months ago