How-to Transcode with Your Own Cloud Storage
Before you start
This guide assumes that you understand the basics of making a Transcode API request. We recommend completing the Getting Started with Transcoding Media guide first.
Transcode with your own cloud storage
For media already stored in the cloud, such as AWS S3 Cloud Storage, Azure Blob Storage, or GCP Cloud Storage, you can use the Transcode API with credential-based access. You do not need to create pre-signed URLs for each input and output. You can define each storage location once, and reference it multiple times inside of your inputs and outputs.
The following sections on this page offer guidance for each storage provider:
- AWS S3 Cloud Storage with Auth Keys
- Microsoft Azure Blob Storage with Access Keys
- Google Cloud Storage with Service Account Credentials
AWS S3 cloud storage with auth keys
If you don't already have AWS credentials, see the separate guide for creating an AWS IAM user. Once you have your access key and secret, see the example below.
Example Storage Block for AWS S3
This example includes the required parameters for accessing your AWS S3 storage with the Transcode API:
- id
Identifier defined by you to reference this storage account when you call the Dolby.io Transcode API. - bucket
The information about the S3 container.- url
The S3 bucket and path to your files. You must use the s3:// prefix. - auth
This object identifies the IAM Access Credentials used to access your S3 account.- key
The IAM user's Access key ID. - secret
The IAM user's Secret access key.
- key
- url
"storage": [
    {
        "id": "my-s3-output-videos",
        "bucket": {
            "url": "s3://my-s3-storage-bucket/output/videos/",
            "auth": {
                "key": "ABCDEIF...ASEOFJHIF",
                "secret": "djkgg39u34i....ogn9gh89w34gh984h"
            }
        }
    }
]
If you are unsure of how to use storage in your job, see defining and correlating your own cloud storage with inputs and outputs on this page.
Microsoft Azure Blob Storage with access keys
First, get your Azure access keys:
- Log into your Azure account or create a new account: https://azure.microsoft.com/en-us/free/.
- Go to the Azure Portal: https://portal.azure.com/.
- On the Storage Accounts section, select your storage account or create a new storage account.
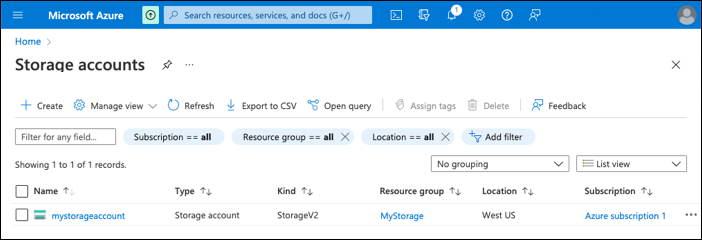
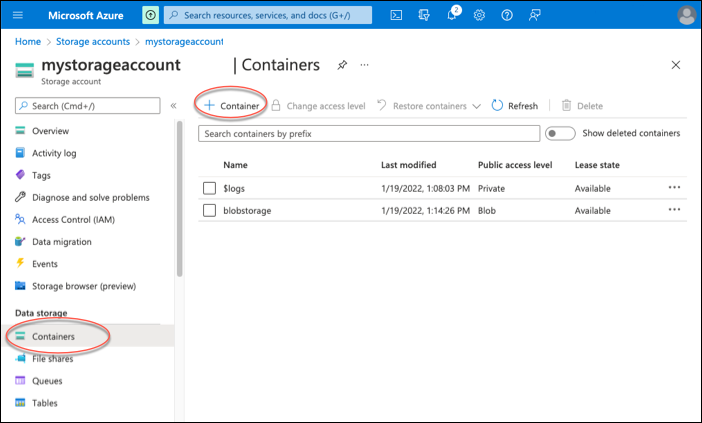
- In your storage account, you need a Blob Container or bucket that contains your media and read/write access. If you do not have a container—under Data Storage, click Containers, and then click + Container.
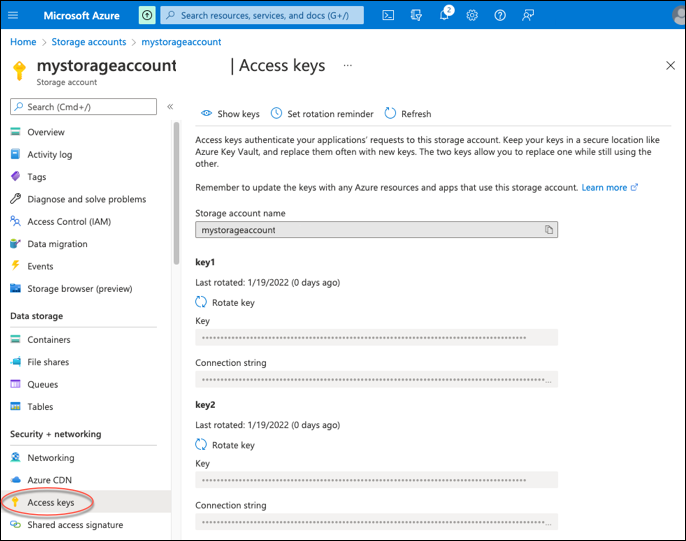
- In your storage account, under Security + Networking, click Access Keys. To access your Azure storage with Dolby.io, provide your storage account name and your access key (for example, key1).
Example storage block for Azure
This example includes the required parameters for accessing your Azure storage with the Transcode API:
- id
Identifier defined by you to reference this storage account when you call the Dolby.io Transcode API. - bucket
The information about the blob container.- url
The blob container to use. You must use the as:// prefix. - auth
This object identifies the access keys used to access your Azure storage.- account_name
Name of your Azure storage account. - key
The Azure access key from your storage account.
- account_name
- url
"storage": [
    {
        "id": "my-as-bucket",
        "bucket": {
            "url": "as://blobstorage/",
            "auth": {
                "account_name": "mystorageaccount",
                "key": "pcayfnVVR12345SGNKfEmWLX3fXumF/fiTpDRAV6bH3/RePc7dLFNLiJqZeVya2iA+vsazW2XLwfvdXTz3tgeQ=="
            }
        }
    }
]
If you are unsure of how to use storage in your job, see defining and correlating your own cloud storage with inputs and outputs on this page.
Google Cloud Storage with service account credentials
First, create a service account under your project to allow Dolby.io to access your GCP Cloud Storage and retrieve the JSON service account credentials:
- Log into your Google Cloud Platform Console or create a new account: https://console.cloud.google.com/.
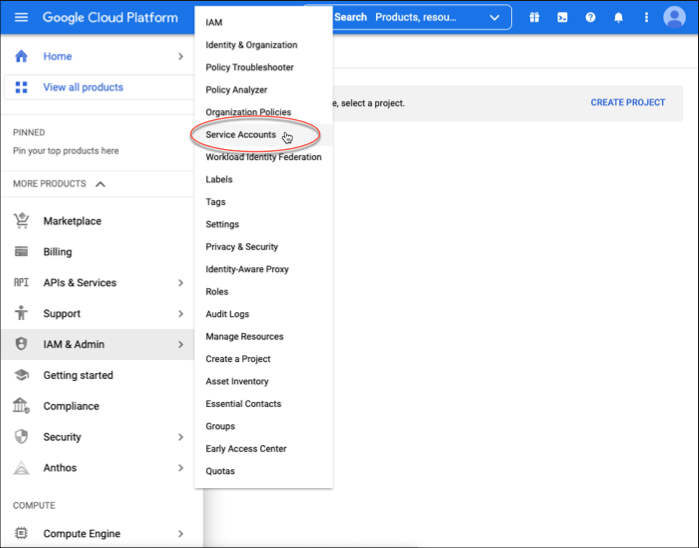
- On the left navigation, select IAM & Admin, and then click Service Accounts.
-
In the Service accounts section, choose your service account. If you need to create a new service account, see the next step.
-
If you do not have a project in the Service accounts section, create a new project. The service account that you will create, will be in this new project.
-
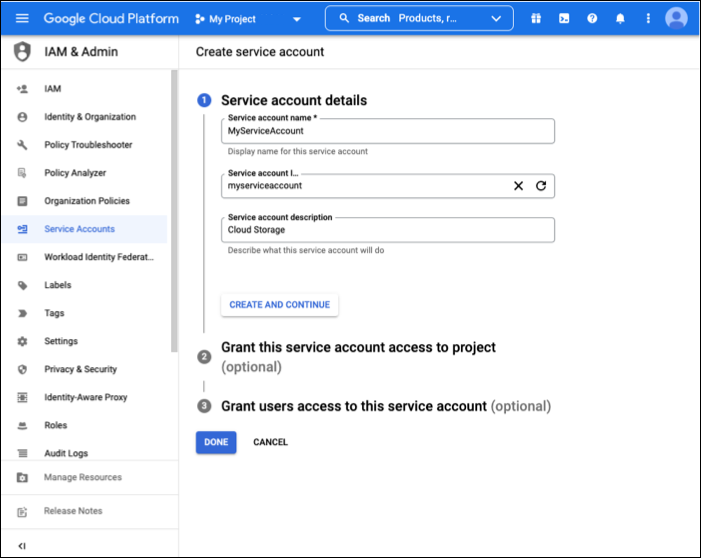
In the Service accounts section, click + CREATE SERVICE ACCOUNT, enter the account details, and then click CREATE AND CONTINUE.
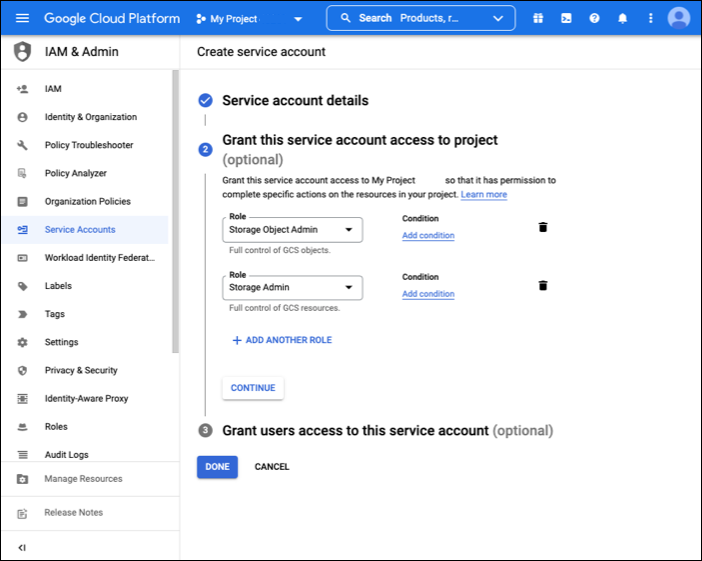
- In the Grant this service account access to project (optional) section, in the Role box, type Storage Object Admin, and then click the role to add it. Click + ADD ANOTHER ROLE, search for Storage Admin, and then click the role to add it.
- In the Grant users access to this service account (optional) section, you can optionally add users or groups who have access to the service account or skip this step. Next, click Done to complete creating the service account.
- In the left navigation, click Service Accounts, and then click the name of your service account.
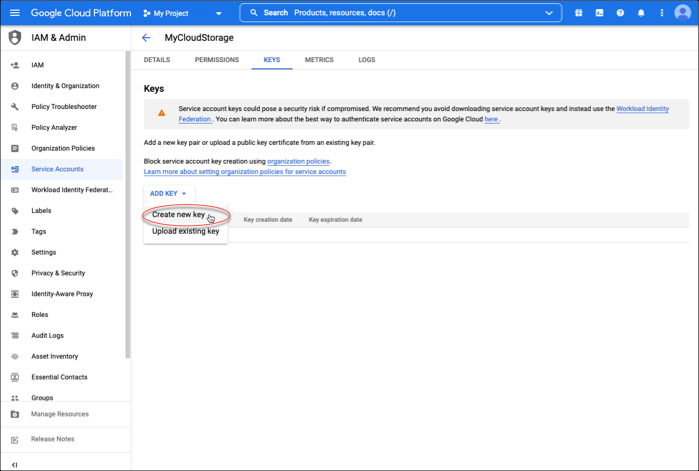
- In the Service account details section, on the top navigation, click KEYs.
- Click Add Key - > Create new key. Click JSON type. This starts the download of a JSON file with the credentials needed to access your GCP Storage from Dolby.io.
Example storage block for GCP Storage
This example includes the required parameters for accessing your GCP storage with the Transcode API:
- id
Identifier defined by you to reference this storage account when you call the Dolby.io Transcode API. - bucket
The information about the GCP container.- url
The GCP Bucket container to use. You must use the gs:// prefix. - auth
The contents of the service account JSON blob that you get from the GCP Console as described above. The contents should not be modified. This example's private_key has been truncated.
- url
"storage": [
    {
        "id": "my-gs-identifier",
        "bucket": {
            "url": "gs://my-gs-bucket/",
            "auth": {
                "type": "service_account",
                "project_id": "my-gs-project-id",
                "private_key_id": "1234567248d6a17a5ed36ff15f4355e6e462811x",
                "private_key": "-----BEGIN PRIVATE KEY-----\nMIIEvgIBADANBgkqhk...7aPF0\n-----END PRIVATE KEY-----\n",
                "client_email": "[email protected]",
                "client_id": "12345678906420614407546",
                "auth_uri": "https://accounts.google.com/o/oauth2/auth",
                "token_uri": "https://oauth2.googleapis.com/token",
                "auth_provider_x509_cert_url": "https://www.googleapis.com/oauth2/v1/certs",
                "client_x509_cert_url": "https://www.googleapis.com/robot/v1/metadata/x509/my-service-acct.iam.gserviceaccount.com"
            }
        }
    }
]
If you are unsure of how to use storage in your job, see defining and correlating your own cloud storage with inputs and outputs on this page.
Define your storage
The Transcode API is frequently used to generate multiple output files. To avoid specifying your storage credentials multiple times, you define each location in a storage list. Each storage object has a unique id that can be used to correlate any listed inputs or outputs. For example, you could write thumbnails and videos into different output folders. And you can connect multiple storage accounts.
Each cloud provider requires specific configuration. You can learn more about how to configure each storage provider on this page. This simple example storage list uses AWS S3 for storage (update the fields with your own bucket name and credentials):
"storage" : [
    {
        "id" : "my-s3-input",
        "bucket" : {
            "url" : "s3://my-s3-storage-bucket/inputs/",
            "auth" : {
                "key": "AKIASZXXXXXXXXYLWWUHQ",
                "secret": "kjYK54XXXXXXXXXZtKFySioE+3"
            }
        }
    },
    {
        "id" : "my-s3-output-thumbnails",
        "bucket" : {
            "url" : "s3://my-s3-storage-bucket/output/thumbnails/",
            "auth" : {
                "key": "AKIASZXXXXXXXXYLWWUHQ",
                "secret": "kjYK54XXXXXXXXXZtKFySioE+3"
            }
        }
    },
    {
        "id" : "my-s3-output-videos",
        "bucket" : {
            "url" : "s3://my-s3-storage-bucket/output/videos/",
            "auth" : {
                "key": "AKIASZXXXXXXXXYLWWUHQ",
                "secret": "kjYK54XXXXXXXXXZtKFySioE+3"
            }
        }
    }
]
While this example demonstrates AWS S3, you can substitute one or more storage definitions from the other provider examples above. You can read inputs and write outputs between multiple cloud providers.
Correlate outputs with storage
When you define storage, you can use that storage object's id in any subsequent inputs or outputs. The ref parameter of a source or destination points at a storage object's id. For multiple output files, you could use a single location or choose different storage locations for each output file you create.
Specify the input file associated with your storage bucket. Link the input file's source.ref to the storage object's id.
"inputs": [
    {
        "source": {
            "ref": "my-s3-input",
            "filename": "my_video.mp4"
        }
    }
],
In your outputs, link the destination's ref to the storage object's id. In this example, we link one output storage location for a video output and another storage location for a thumbnail output.
This example is abbreviated to show how ref and id are used. (See the Full Example Request on this page.)
...
"outputs": [
    {
        "destination": {
            "ref": "my-s3-output-videos",
            "filename": "airplane_transcoded.mp4"
        },
        "kind": "mp4"
    },
    {
        "destination": {
            "ref": "my-s3-output-thumbnails",
            "filename": "airplane_thumbnail.jpg"
        },
        "kind": "jpg",
        "image": {
            "height": 360
        }
    }
],
"storage": [
    {
        "id": "my-s3-output-videos",
        "bucket": {
            "url": "s3://my-s3-storage-bucket/output/videos/",
            "auth": {
                "key": "AKIASZXXXXXXXXYLWWUHQ",
                "secret": "kjYK54XXXXXXXXXZtKFySioE+3"
            }
        }
    },
    ...
Full example request
This example shows you how to generate a thumbnail image and video outputs. For both inputs and outputs, the buckets are defined in the storage array. If you use this example, be sure to update your buckets/paths, credentials, as well as your Dolby.io API Token.
import os
import requests

# Add your API token as an environmental variable or hard coded value.
api_token = os.getenv("DOLBYIO_API_TOKEN", "your_token_here")

url = "https://api.dolby.com/media/transcode"
headers = {
    "Authorization": "Bearer {0}".format(api_token),
    "Content-Type": "application/json",
    "Accept": "application/json"
}

body = {
     "inputs": [
        {
            "source": {
                "ref": "my-s3-input",
                "filename": "my_video.mp4"
            }
        }
    ],
    "outputs": [
        {
            "destination": {
                "ref": "my-s3-output-videos",
                "filename": "airplane_transcoded.mp4"
            },
            "kind": "mp4",
            "video": {
                "codec": "h264",
                "height": 1080,
                "bitrate_mode": "vbr",
                "bitrate_kb": 6500
            },
            "audio": [{
                "codec": "aac_lc",
                "bitrate_kb": 128
            }]
        },
        {
            "destination": {
                "ref": "my-s3-output-thumbnails",
                "filename": "airplane_thumbnail.jpg"
            },
            "kind": "jpg",
            "image": {
                "height": 360
            }
        }
    ],
    "storage": [
        {
            "id": "my-s3-input",
            "bucket": {
                "url": "s3://my-s3-storage-bucket/input/videos/",
                "auth": {
                    "key": "AKIASZXXXXXXXXYLWWUHQ",
                    "secret": "kjYK54XXXXXXXXXZtKFySioE+3"
                }
            }
        },
        {
            "id": "my-s3-output-thumbnails",
            "bucket": {
                "url": "s3://my-s3-storage-bucket/output/thumbnails/",
                "auth": {
                    "key": "AKIASZXXXXXXXXYLWWUHQ",
                    "secret": "kjYK54XXXXXXXXXZtKFySioE+3"
                }
            }
        },
        {
            "id": "my-s3-output-videos",
            "bucket": {
                "url": "s3://my-s3-storage-bucket/output/videos/",
                "auth": {
                    "key": "AKIASZXXXXXXXXYLWWUHQ",
                    "secret": "kjYK54XXXXXXXXXZtKFySioE+3"
                }
            }
        }
    ]
}

try:
    response = requests.post(url, json=body, headers=headers)
    response.raise_for_status()
except requests.exceptions.HTTPError as e:
    raise Exception(response.text)
print(response.json()["job_id"])
// Add your API token as an environmental variable or hard coded value.
const api_token = process.env.DOLBYIO_API_TOKEN || "your_token_here"

const axios = require("axios").default
const config = {
    method: "post",
    url: "https://api.dolby.com/media/transcode",
    headers: {
        "Authorization": `Bearer ${api_token}`,
        "Content-Type": "application/json",
        "Accept": "application/json"
    },
    data: {
        "inputs": [
            {
                "source": {
                    "ref": "my-s3-input",
                    "filename": "my_video.mp4"
                }
            }
        ],
        "outputs": [
            {
                "destination": {
                    "ref": "my-s3-output-videos",
                    "filename": "airplane_transcoded.mp4"
                },
                "kind": "mp4",
                "video": {
                    "codec": "h264",
                    "height": 1080,
                    "bitrate_mode": "vbr",
                    "bitrate_kb": 6500
                },
                "audio": [{
                    "codec": "aac_lc",
                    "bitrate_kb": 128
                }]
            },
            {
                "destination": {
                    "ref": "my-s3-output-thumbnails",
                    "filename": "airplane_thumbnail.jpg"
                },
                "kind": "jpg",
                "image": {
                    "height": 360
                }
            }
        ],
        "storage": [
            {
                "id": "my-s3-input",
                "bucket": {
                    "url": "s3://my-s3-storage-bucket/input/videos/",
                    "auth": {
                        "key": "AKIASZXXXXXXXXYLWWUHQ",
                        "secret": "kjYK54XXXXXXXXXZtKFySioE+3"
                    }
                }
            },
            {
                "id": "my-s3-output-thumbnails",
                "bucket": {
                    "url": "s3://my-s3-storage-bucket/output/thumbnails/",
                    "auth": {
                        "key": "AKIASZXXXXXXXXYLWWUHQ",
                        "secret": "kjYK54XXXXXXXXXZtKFySioE+3"
                    }
                }
            },
            {
                "id": "my-s3-output-videos",
                "bucket": {
                    "url": "s3://my-s3-storage-bucket/output/videos/",
                    "auth": {
                        "key": "AKIASZXXXXXXXXYLWWUHQ",
                        "secret": "kjYK54XXXXXXXXXZtKFySioE+3"
                    }
                }
            }
        ]
    }
axios(config)
    .then(function(response) {
        console.log(response.data.job_id)
    })
    .catch(function(error) {
        console.log(error)
    })
#!/bin/bash

# Add your API token as an environmental variable or hard coded value.
API_TOKEN=${DOLBYIO_API_TOKEN:-"your_token_here"}

curl -X POST "https://api.dolby.com/media/transcode" \
    --header "Authorization: Bearer $API_TOKEN" \
    --header 'Content-Type: application/json' \
    --header 'Accept: application/json' \
    --data '{
        "inputs": [
            {
                "source": {
                    "ref": "my-s3-input",
                    "filename": "my_video.mp4"
                }
            }
        ],
        "outputs": [
            {
                "destination": {
                    "ref": "my-s3-output-videos",
                    "filename": "airplane_transcoded.mp4"
                },
                "kind": "mp4",
                "video": {
                    "codec": "h264",
                    "height": 1080,
                    "bitrate_mode": "vbr",
                    "bitrate_kb": 6500
                },
                "audio": [{
                    "codec": "aac_lc",
                    "bitrate_kb": 128
                }]
            },
            {
                "destination": {
                    "ref": "my-s3-output-thumbnails",
                    "filename": "airplane_thumbnail.jpg"
                },
                "kind": "jpg",
                "image": {
                    "height": 360
                }
            }
        ],
        "storage": [
            {
                "id": "my-s3-input",
                "bucket": {
                    "url": "s3://my-s3-storage-bucket/input/videos/",
                    "auth": {
                        "key": "AKIASZXXXXXXXXYLWWUHQ",
                        "secret": "kjYK54XXXXXXXXXZtKFySioE+3"
                    }
                }
            },
            {
                "id": "my-s3-output-thumbnails",
                "bucket": {
                    "url": "s3://my-s3-storage-bucket/output/thumbnails/",
                    "auth": {
                        "key": "AKIASZXXXXXXXXYLWWUHQ",
                        "secret": "kjYK54XXXXXXXXXZtKFySioE+3"
                    }
                }
            },
            {
                "id": "my-s3-output-videos",
                "bucket": {
                    "url": "s3://my-s3-storage-bucket/output/videos/",
                    "auth": {
                        "key": "AKIASZXXXXXXXXYLWWUHQ",
                        "secret": "kjYK54XXXXXXXXXZtKFySioE+3"
                    }
                }
            }
        ]
    }'
If you are looking for an easier solution, check out this blog detailing how to transcode files using Zapier and Google Drive as a solution.
Updated 6 months ago