How-to Start Live Clipping
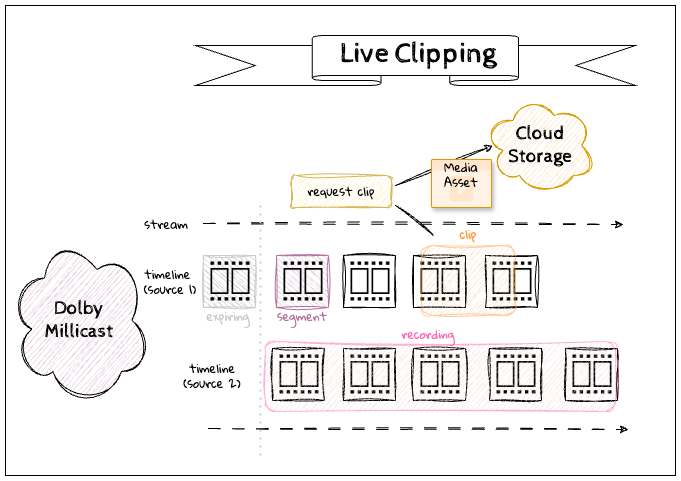
Live Clipping allows you to capture one or more simultaneous media files (ie. clips) while a broadcast event is in progress. This is in contrast to a recording which is a media file that captures the full duration of a single source only after the completion of a broadcast. The duration of a clip can be customized to capture highlights or shorter segments while still live for use cases that want instant replay, social sharing, or audit reviews.
This opens up new possibilities for engaging audiences with dynamic and interactive viewing experiences.
Premium API
This feature is a premium option that must be enabled on your plan. If you would like to use this endpoint, please submit a support ticket or reach out to your sales/solutions contact.
Creating Clips by API
Many broadcasts have streams that regularly exceed 12 or 24 hours. Maintaining a recording for the entire duration may not always make sense. By using the clipping feature, you can capture a customizable duration or series of shorter clips as part of your application and workflow.
Getting Started with REST APIs
Review the REST API Getting Started tutorial for details on retrieving your API Key for authenticating your API calls. The examples included here use the
cURLcommand-line utility. Alternatively, there are Postman Collections and a REST Client for Node that may be helpful for your project.
Application Architecture
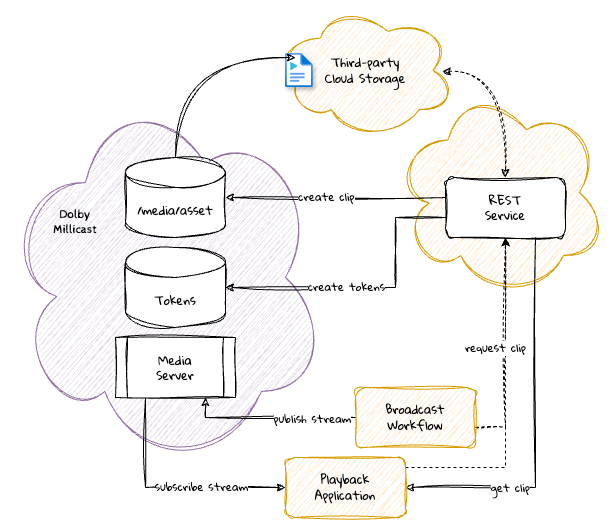
When setting up your applications and workflows, you'll want to create a service that can manage your live clipping requests. Your service should call the /media/assets API to create clips based on the needs of your playback and broadcast workflow.
This is a typical pattern for application integration.
How-to Create a Clip
The Create Media Asset endpoint can be used to create a clip by specifying at minimum a startTime and streamName.
curl --request POST \
  --url https://api.millicast.com/api/v3/media/assets \
  --header 'Authorization: Bearer abc123' \
  --data '
{
  "name": "broadcast-2024-10-01-clip-0133333",
  "streamName": "my-first-broadcast",
  "startTime": "2024-10-01T01:33:33Z",
  "stopTime": "2024-10-01T01:34:33Z"
}
'
The stopTime is optional and if not specified will use the last segment from the timeline (ie. "now"). The precise start and stop times of the resulting clip may vary slightly depending on encoding settings. We recommend that encoding settings use an I-Frame period of 1s when using the service to increase precision when aligning keyframes with media segments.
Enable Live Clipping
Before beginning a broadcast, you must enable the
clipsetting on the Publish Token being used for the stream. You will not be able to clip media until your broadcast with this setting has started.
How-to Avoid Duplicate Clips
For applications where there may be race conditions that result in multiple calls to create a clip with the same parameters will result in more than one clip being generated.
To avoid this scenario, use of the Idempotency-Key header can help identify requests that may share the same stream id and timestamp so that repeated calls with the same key will be ignored.
curl --request POST \
  --url https://api.millicast.com/api/v3/media/assets \
  --header 'Authorization: Bearer abc123' \
  --header 'Idempotency-Key: my-popular-broadcast-2024-10-01-01-33-33' \
  --data '
{
  "name": "broadcast-2024-10-01-clip-0133333",
  "streamName": "my-popular-broadcast",
  "startTime": "2024-10-01T01:33:33Z",
  "stopTime": "2024-10-01T01:34:33Z"
}
'
How-to Use Your Own Cloud Storage
By default, clips will be kept in Dolby's storage. Alternatively, you can use your own cloud storage such as AWS S3 or Google Cloud Storage. Review the How-to Setup Media Storage tutorial for details on creating storage profiles.
With a storage profile, you can specify where you want a clip to be sent when it is finished processing.
curl --request POST \
  --url https://api.millicast.com/api/v3/media/assets \
  --header 'Authorization: Bearer abc123' \
  --data '
{
  "name": "broadcast-2024-10-01-clip-0133333",
  "streamName": "my-first-broadcast",
  "startTime": "2024-10-01T01:33:33Z",
  "stopTime": "2024-10-01T01:34:33Z",
  "storage": {
    "profileId": "750fb4a949c38fd4dd54aaa4fc885a"
  }
}
'
The default profile as configured in your Account Storage Profiles will be used by default. Any storage settings on an individual request will supersede the account settings such as using an alternative profileId or including an alternative type, objectPrefix, and bucketName directly with the request.
How-to Set an Expiration Time for Clips
When clips are left in Dolby's cloud storage there will be additional fees for each GB/hour utilized. When requesting a clip, you can explicitly set when you want the clip to be removed. For example, this request specifies an expiration for 48 hours after the clip was created to have it marked for deletion. This can help avoid charges for unnecessary storage, but keep in mind this will delete the media completely so there will not be a way to recover it.
curl --request POST \
  --url https://api.millicast.com/api/v3/media/assets \
  --header 'Authorization: Bearer abc123' \
  --data '
{
  "name": "broadcast-2024-10-01-clip-0133333",
  "streamName": "my-first-broadcast",
  "startTime": "2024-10-01T01:33:33Z",
  "stopTime": "2024-10-01T01:34:33Z",
  "expiration": 2024-10-03T01:34:33Z"
}
'
The expiration on a Create Media Asset request will supersede any Expiration Rule configured as the account default.
Troubleshooting
Some issues you may encounter when setting up a live clipping workflow.
No timelines found matching clipping requirements
The timeline is stored only temporarily and will expire according to any expiration rules that may be applied on new media.
{
    "status": "fail",
    "data": {
        "message": "No timelines found matching clipping requirements. Ensure clipping is enabled on token and Timeline(s) with specified conditions exist."
    }
}
If you see this message, make sure the startTime and stopTime are within bounds of the available timelines. Use ?type=timeline to find available timeline media assets as described in: How-to Get Media Assets.
Name may not contain characters
The name of clips should not contain the : character because many cloud storage providers do not allow certain characters within object naming conventions.
{
    "status": "fail",
    "data": {
        "errors": {
            "Name": [
                "Name may not contain character(s) (:)"
            ]
        },
        "message": "Validation errors"
    }
}
Clip duration doesn't match request
The start and end times of the clip may vary from the requested times based upon the I-Frame frequency. We recommend using an iframe period of 1s.
Updated 4 months ago