vMix
How-to Broadcast using vMix with RTMP and NDI
vMix is a desktop application that provides a software vision mixer and encoder for the Windows operating system. It allows users to switch inputs, mix audio, record output, and live stream cameras, video files, audio, and more.
You can originate a broadcast from vMix and forward that stream over RTMP, SRT, or as an NDI source.
Getting Started
If you haven't already, begin by following the Getting Started tutorial to create a Dolby.io application and start your first broadcast.
See the official vmix.com site for documentation, installation instructions, and additional support.
How-to use vMix with RTMP
In order to broadcast with RTMP, you will need to have your RTMP publish path and RTMP publish stream name available.
See the RTMP Broadcast Guide for details on how to retrieve these values.
Configure a custom RTMP server
Within vMix, select the Streaming Settings menu to enter your publishing destination.
- URL: use your RTMP publish path
- Stream Name or Key: use your RTMP publish stream name
Set the Application to FFMPEG.

Select the Quality settings. Make sure the Profile is set to Baseline. You may experience stutters when using another profile.

You can configure the other Audio and Video settings based on your preferences and network capacity.
Save your publishing profile and you are ready to start publishing with vMix.
Setup multi-bitrate RTMP streaming with vMix
With vMix you have the ability to send a live stream simultaneously to up to three separate streaming destinations. This vMix feature combined with Dolby.io Multisource Streams enables Simulcast of multiple renditions of the stream. Viewers with bandwidth constraints would receive a stream optimized for that condition. Keep in mind, the broadcaster will be sending multiple streams so will need adequate bandwidth.
Enable Multisource for Your Dolby.io Publish Token
To utilize multisource it must be enabled for the publish token. You can do this from the Dolby.io dashboard. For more information, review Managing Tokens.
Streaming destination 1: 1080p
The first destination URL and Stream Name would remain much as it was configured in the previous section with a few adjustments.
- sourceId=1: add this query parameter to the Stream Name to differentiate from the other sources
- simulcastId: add this query parameter to indicate it should be a Simulcast stream

You might also adjust the Quality Settings to use 1080p for this source.
| Name | 1080p |
|---|---|
| RTMP Server | rtmp://live-rtmp-pub.millicast.com:1935/v2/pub/ |
| RTMP Key | {StreamName}?token={Token}&sourceId=1&simulcastId |
| Encoder | FFMPEG |
| Resolution | 1920x1080 |
| Bitrate | 6000kbps or as shown 4500kbps |
| Keyframe | 2 |
Streaming destination 2: 720p
Select a second target destination. Update the sourceId to reflect that this is the second source.

Adjust the quality settings to be a lower framerate, bitrate, and resolution to conserve bandwidth.
| Name | 720p |
|---|---|
| RTMP Server | rtmp://live-rtmp-pub.millicast.com:1935/v2/pub/ |
| RTMP Key | {StreamName}?token={Token}&sourceId=2&simulcastId&videoOnly |
| Encoder | FFMPEG |
| Resolution | 1280x720 |
| Bitrate | 2000kbps or as shown 1500kbps |
| Keyframe | 2 |
Streaming destination 3: 360p
As with the other example, update the sourceId and adjust the quality settings to provide a constrained bandwidth solution.

| Name | 360p |
|---|---|
| RTMP Server | rtmp://live-rtmp-pub.millicast.com:1935/v2/pub/ |
| RTMP Key | {StreamName}?token={Token}&sourceId=3&simulcastId&videoOnly |
| Encoder | FFMPEG |
| Resolution | 640x360 |
| Bitrate | 500kbps |
| Keyframe | 2 |
Start and view streams
In vMix click start all streams. You can then watch this stream from a playback viewer. If you select the viewer settings, you can see that there are multiple Video Quality renditions available.

How-to use vMix with SRT
In order to broadcast with SRT, you will need to have your SRT publish path and SRT stream ID available.
See the SRT Broadcast Guide for details on how to retrieve these values.
vMix settings
- Select the Output / NDI / SRT settings and configure an output by clicking the gear icon.
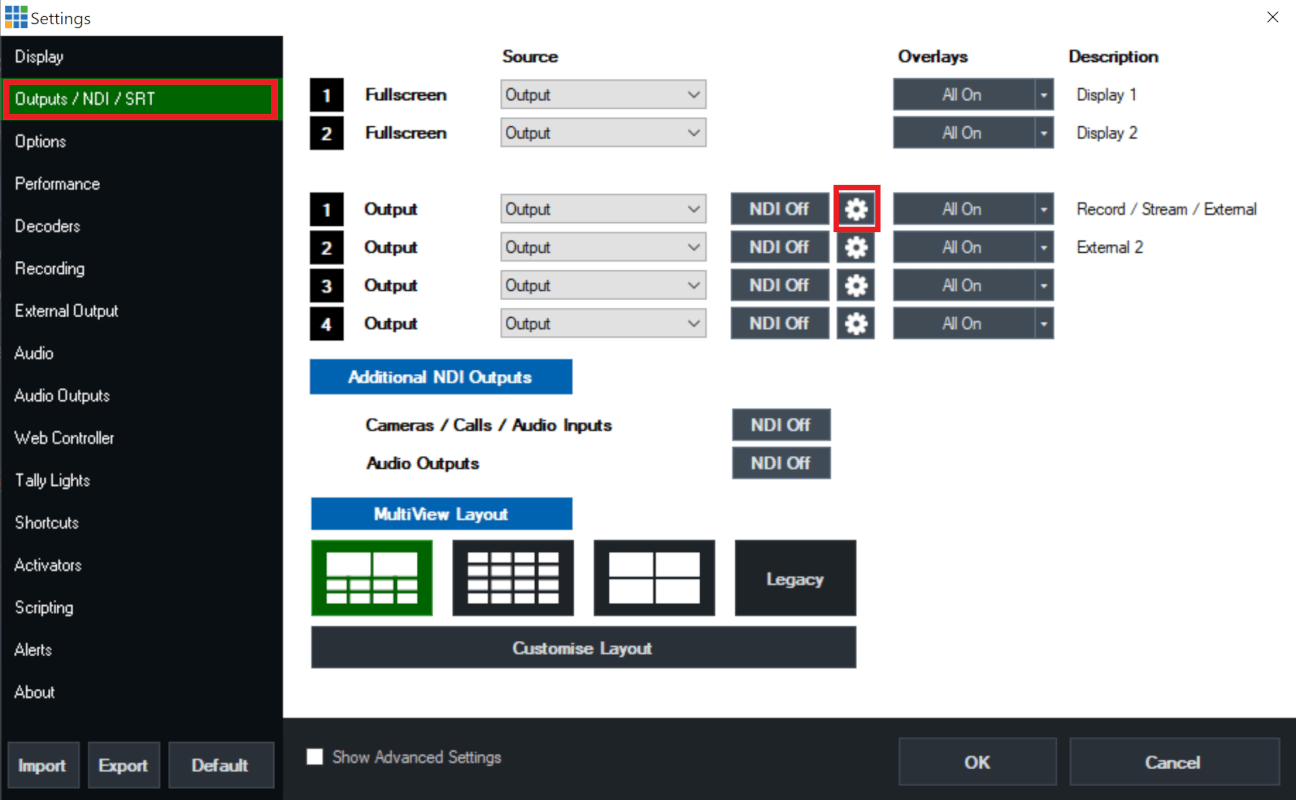
- Check the
Enable SRTsetting. - Input the SRT path in for
Hostname. ThePortcan be removed and put in the additional field. - Input the SRT stream ID in the
Stream IDfield.

It is recommended to set the Quality as H264 1mbps AAC 0kbps (5 secs).
How-to use vMix with NDI
vMix can also be set as an NDI source with OBS. This can give you the flexibility to use vMix as your switcher and OBS with WebRTC and playback in a Hosted Player.
To configure this, choose the Outputs / NDI / SRT configuration.

Network Traffic
It is recommended to use a hard-wired connection between NDI sources or a dedicated network with Quality of Service (QoS) enabled. You may observer 40 Mbps or more of network traffic with this type of configuration. This network traffic congestion and limited bandwidth can create issues with playback audio and/or video quality.
Updated 11 months ago